For the latest updates, see EPR Release Notices.
For EPR related videos, check out Digital Education's YouTube Channel.
For the latest updates, see EPR Release Notices.
For EPR related videos, check out Digital Education's YouTube Channel.
Order Entry Overview
The Order Entry function is used to enter procedures for patients including:
Laboratory procedures (Orders must be placed in the system before specimens can be processed and results can be reported);
Medical imaging procedures;
Diets;
Medications.
At UHN, prescribers must enter their own orders in EPR unless they are unable to do so (e.g. in the OR, no access to EPR, urgent or emergent situations, etc.). In those cases, nurses may enter a telephone, written, or verbal order on their behalf and the order will then be active immediately. Senior medical students can place orders within EPR for labs and diagnostic tests and those orders are active immediately. Medication orders placed by senior medical students will not be active until signed off in the Inbox by a physician.
Review the following EPR terminology:
Term |
Definition |
Procedure |
Items that will be performed on or administered to the patient (labs, diagnostic tests, medication, doses, diets etc.)
|
Order |
Request for a procedure
|
Order Block |
Single order or group of orders being entered into the EPR at the same time
|
Order Block Type |
Indicates if the order was entered as direct, verbal, written or telephone
|
Order Author |
Person who authorized the order (e.g. physician, nurse practitioner, etc.)
|
Event |
An instance of the procedure that is scheduled for a specific date/time, based on the order details (ex.: a PT/INR is ordered as ‘daily at 1000’; this means that there is a 10:00 AM event for the PT/INR Test every day)
|
Orders are placed from within the patient chart, and need to be done on the appropriate visit. In this example, you will review Order Entry from the patient's active inpatient visit. Orders attached to discharged, cancelled or no-show visits are NOT accessible by specimen collection staff.
Note:
Before placing any orders, the patient's allergies and adverse reactions must be documented or confirmed for the current visit (click here for additional allergy information).
Prior to entering medication orders, the VTE Prophylaxis assessment must be done, otherwise an alert will come up. See subtopic Placing the Order for VTE Prophylaxis for more information.
To access the Order Entry Screen, you must find the Order Entry link on the Patient Desktop. The location of this link will vary, dependent on your role and/or type of EPR access. For most people, the Order Entry link is located under the Patient Shortcuts on the left of the screen.
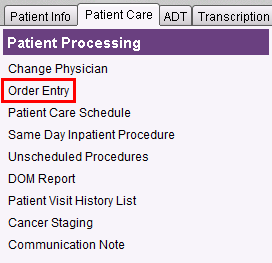
1. Click on the Order Entry link under Patient Shortcuts on the Patient Desktop.
Note: If the shortcut is not visible, look for the link under the Patient Care tab and under Patient Processing.


2. Prescribers (i.e., Physicians, Nurse Practitioners, etc.) have direct access to Order Entry - skip to point 3 below.
The Order Entry - Order Information screen will appear for other health care professionals or staff (i.e., Dietitians, Pharmacists, Clinic Secretaries, etc.). You will need to enter the following information before accessing the Order Entry screens.
Order Type (click to see more information on the various order types) - select the option which best represents the way in which you received the order.
Order Time - this field defaults to now (the current date/time). You can accept the default time now or change the date/time, as appropriate for when the order was actually given.
Order Author - select the prescriber on whose behalf you are placing the order. Prescriber names that appear are the prescribers assigned to the patient. You can also search from the full list of EPR prescribers. For more information, see the topic on Order Author Authority.
Once the above items have been selected, click OK to continue.

3.
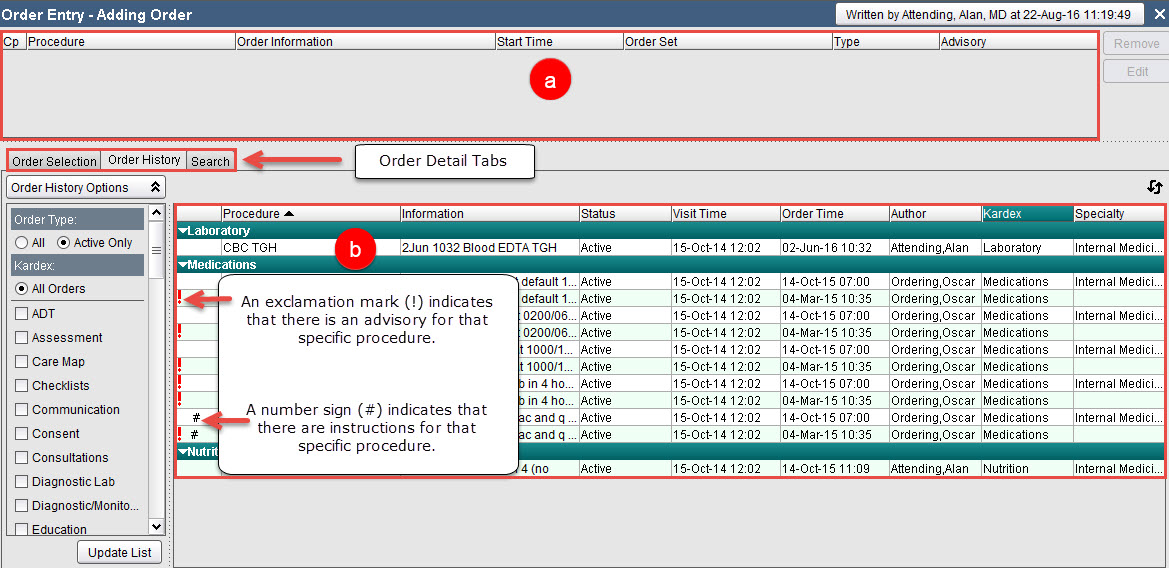
The main Order Entry screen now appears. It is divided into
two main sections (see details below the screen shot):

a. Order Preview section - allows you to preview orders before activating them, in addition to Removing or Editing them (see buttons on right).
b. Order Details Tabs - this section is divided into three different tabs:
Order History Tab - on most desktops, this is the default
tab on the Order Entry screen. It displays the patient's active
orders for the current visit sorted alphabetically by Procedure name,
in ascending order. If you have several items listed that you want
to sort in descending order, you can click
the Procedure column header. From this tab you can also change,
discontinue, or hold existing orders.
IMPORTANT:
for patient safety reasons you must check the Order History
tab for all existing orders before placing new orders to avoid duplication
and conflicting orders.
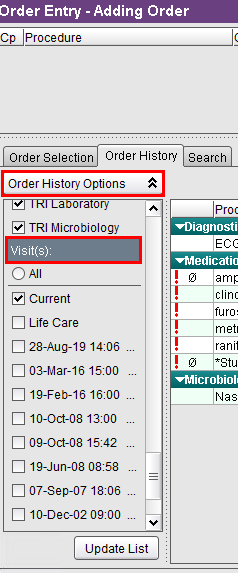
You
can adjust the default filter to show active orders from "All"
visits as applicable (i.e. to double-check recurring scheduled orders
from past visits). Under the Order
History Options, scroll
down until you see the Visits
header. To see orders from past visits, select the All radio button or the desired visit(s).

Order Selection Tab - New orders for the patient can be placed here. This tab organizes procedures within folders so that you can easily order items that are common for the patient's specialty or service unit. When a folder is selected from the Order Selection Options on the left side of the screen, the associated common procedures appear on the right side and you can check off the items you wish to order for the patient. See the Order Selection Tab topic for more information.
Search Tab - New orders for the patient can also be placed here. This tab allows you to enter procedure names to search for items that you can't find in the Order Selection folders. You can enter either the full procedure name, or perform a partial word search using the wildcard symbol (-). See the Order Search Tab topic for more information.
4. To see how to place new orders, see either the Order Selection Tab or Order Search Tab topics. There are many other Order Entry topics - please use the topic navigation structure of the eManual, located on the left of your screen to browse other topics that are relevant to you.
For each order that you select, EPR has a pre-defined form that must be completed, called the Order Details screen. The number and type of fields vary depending on the order item. A bold field means it is mandatory to complete.
Note: When ordering lab tests for prioritized processing from the Rapid Response folder along with routine labs for the same patient, always enter all Rapid Response Lab orders and accept, before ordering the routine labs. Ordering both at the same time, creates delays for rapid response orders.
When entering orders for individual procedures, the Instructions and Comment fields allow for interdisciplinary communication and must be used appropriately.
Instructions – these are predefined notes that are built in the system and/or are manually entered during order entry. They contain important information about the order itself (ie. max daily dose info, associated medication names, etc.). The text in this field will be sent to the Pharmacy BDM system as Directions.
Comment – these non-mandatory notes could be predefined and built into the system and/or manually entered during order entry. EPR is not able to decipher the free-texted information in this field and therefore no crucial information should appear here. The Comment field should be used as a last resort if information does not logically fit in another EPR field. The text in this field will be sent to the Pharmacy BDM system as All Comments.
The Instructions and Comment field details will be visible on the MAR from the Admin All screen - For further information on how they appear on the MAR, see topic MAR - Instructions and Comments.
Instructions and Comment field details can also be viewed from the Order Details screen. For more information, see the topic Order Details Screen.