For the latest updates, see EPR Release Notices.
For EPR related videos, check out Digital Education's YouTube Channel.
For the latest updates, see EPR Release Notices.
For EPR related videos, check out Digital Education's YouTube Channel.
ALC Order Entry
For questions, concerns, or more information about this topic, please contact your Clinical Educator or PCC.
Covered in this topic:
Backdating an ALC Order (Nursing Staff only)
1. From the Patient Desktop, Patient Shortcuts menu, click Order Entry.
2. Under the Order Selection tab, select the Alternate Level of Care folder and select the appropriate ALC Proposed Destination.

3. Enter the Discharge Destination Determination Date.
4. Select the Most Appropriate
Discharge Destination: Where patient should be discharged / transferred
based on care needs, irrespective of whether discharge destination is
available, accessible and/or exists within community.
5. Click OK from the order entry screen and click Add Order.
6. Click on Order Summary.
7. Click on Accept Order to save.
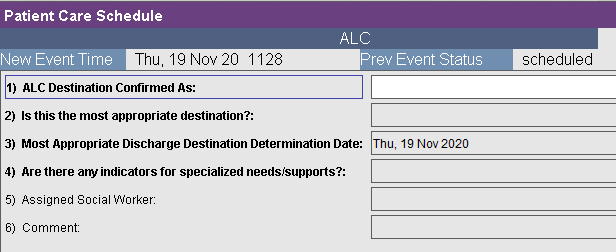
Once the ALC Order has been placed, it needs to be documented in the Patient Care Schedule, to finalize the process. If you see the ALC Order in the Order Entry, Order History Tab, this means the process has not yet been completed.

1. From the Patient Desktop, Patient Shortcuts menu, click Patient Care Schedule.
2. Search for and select the ALC order.

3. Choose the Document button to process the order.

4. Enter the procedure date and time or click OK for now.

5. Respond to all of the form fields and click Accept when done.
Backdating an ALC Order (Nursing Staff only)
The majority of ALC orders should be placed from the physician desktop since the ALC designation requires a medical decision. This decision can only be made by a physician or authorized designate (i.e. APN or physician assistant).
ALC orders placed directly from the nursing desktop should only occur under exceptional circumstances, specifically when the ALC order needs to be backdated.
Before the order can be backdated, the original order should be canceled. See ALC Cancelling an ALC Order for steps on how to do this.
1. From the Patient Desktop, Patient Shortcuts menu, click Order Entry.
2. Select Written as the Order Type.
3. In the Order Time field, click the drop down arrow and select the backdated month, day and time for order and click OK.

4. Click on Order Author and select the physician’s name who wrote the ALC order and click OK.
Note: The Order Author box is defaulted to the patient’s attending physician. If another physician placed the ALC order, search the physician’s name and select the appropriate name.

7. Follow Step 2-7 under Adding an ALC Order.
The Physician / APN / Physician Assistant can discontinue ALC orders that have not yet been documented in instances when it is realized that ALC was ordered for the wrong patient. The discontinue button is available for every order entry procedure.
1. From the Order History tab, select the ALC order and click on Discontinue.

2. Click OK to accept the default time of now.
3. Click OK in Discontinue Order Event Options screen.
4. Click OK to Discontinue Time.
5. Click Order Summary.
6. Choose. Accept Order.
It is important to retrieve input from all multidisciplinary team members regarding patient's current medical status. Often, a patient's medical status can change. It is important to ask the question on a daily basis "Is the patient still ALC?”. If a patient's medical status does change from ALC to acute after the original order has been documented, the Provider is required to place an ALC Removal order.
ALC Removal follows the same steps as ALC Order Entry, except that ALC Removal is selected instead of an ALC Proposed Destination.
1. From the Patient Desktop, Patient Shortcuts menu, click Order Entry.
2. Under the Order Selection tab, select the Alternate Level of Care folder and select ALC Removal.

3. Click on Add Order.
4. Select the appropriate ALC Removal Reason option and click OK.

5. Enter comments if needed and click OK.
6. Click Order Summary.
7. Click Accept Order.
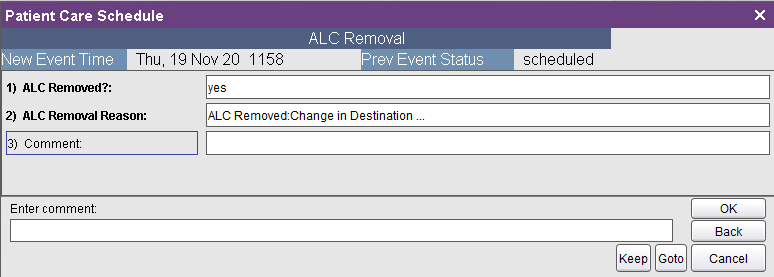
Once the ALC Removal Order has been placed, it needs to be documented in the Patient Care Schedule, to finalize the process. If you see the ALC Removal Order in the Order Entry, Order History Tab, this means the process has not yet been completed.

1. From the Patient Desktop, Patient Shortcuts menu, click Patient Care Schedule.
2. Search for and select the ALC order.

3. Choose the Document button to process the order.
4. Enter the procedure date and time or click OK for now.
5. You will be given the option to enter a comment if needed. Click OK and then Accept to finalize the process.