For the latest updates, see EPR Release Notices.
For EPR related videos, check out Digital Education's YouTube Channel.
For the latest updates, see EPR Release Notices.
For EPR related videos, check out Digital Education's YouTube Channel.
Patient Care Schedule
Covered in this topic:
Navigating the Patient Care Schedule
Navigating the Patient Care Schedule
The Patient Care Schedule displays past, present and up to five days
of future scheduled events in chronological order for that visit. It
is a useful tool for reviewing patient care events or for processing items.
It is different from Chart Review for several important reasons:
The events are the most up-to-date version of themselves. Audit Trail is only available for some items.
Patient Care Schedule allows for correcting or supplementing procedures or tasks that have been recently documented. It is not read-only.
Note: On September 27, 2019, all Toronto Western and Toronto Rehab visits were discharged and recreated under the newly merged facility/site called "UHN". As a result of this data merge, there will be a surplus of visits that appear to have been created on that date at the newly merged UHN Facility. Accordingly, the Patient Care Scheduled for all affected visits, will appear to have restarted on September 27. To view all visit information on visits taking place at this time, you must also search for the discharged visit for the full Patient Care Schedule, as needed.
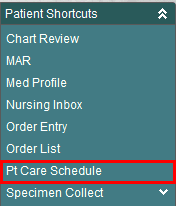
1. Click on the Patient Care Schedule link from the Patient Shortcuts menu on the Patient Desktop.

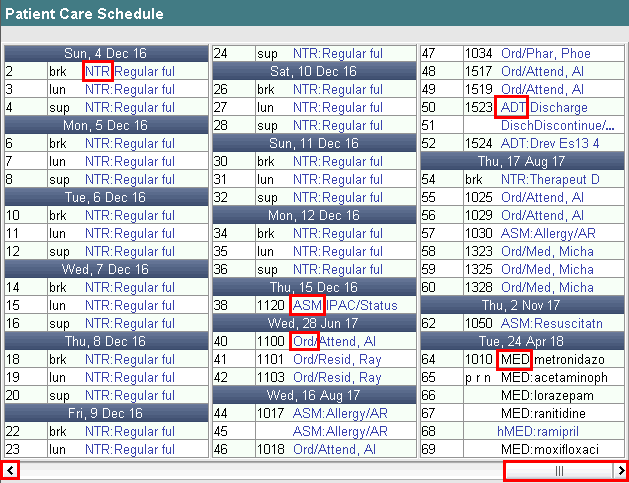
2. The Patient Care Schedule appears. Notice that there are different headings and colours used in the Patient Care Schedule. The following describes what the headings and colours represent:
Scroll bar: if there are more events that don’t fit on the current screen, a scroll bar will appear at the bottom of the screen.
Date Banner: Blue banners indicate dates where the patient has scheduled events. Under each date banner are the events that are (or were) scheduled for that date.
Time Heading: Events that occur at the same time are grouped together under a time heading. The time only appears for the first entry.
Day Heading: An event ordered for the day without a specific time will display under the appropriate date with the heading "day" on the first event.
Meal Times: These are indicated by brk, lun, and sup.
Event Type: Events are always identified with a prefix then a procedure abbreviation:
· ASM - assessments documented
· ADT - admission, discharge or transfer event
· LAB - lab event (specimen/test)
· Ord - orders entered
· RAD - radiology event (procedure)
· NTR - nutrition event (meal)
· Micro - microbiology event (specimen)
· MED - medication event (dose)

Font colours have the following meaning:
Black: Pending/Incomplete.
Blue: Complete/Cancelled/Held/Resolved.
Black/Blue combination: An unauthorized order waiting to be signed by the MD.
Red: STAT order
If you wish to review an item in the Patient Care Schedule, select the item and click OK.
The item details will open and the transaction line will give option buttons that allow for further review.
Note: Different options may be available depending on the event selected.

Mark: This option is not used at UHN.
Print Results: This option will allow you to print results that you are viewing.
Review: Puts the event in review mode. Provides access to additional review options such as Audit (who has done what to the event) and Trend (trended results)
If you wish to fix any documentation from the Patient Care Schedule, select the item to open it in full and then use the appropriate option:
Correct/Supplement -Correct: Allows you to correct the documented information. Changed information will be accepted (saved), but the documentation retains the original event time.
Correct/Supplement -Supplement: Allows you to supplement the documented information. Added information will be accepted (saved), but the documentation retains the original event time. Therefore, never use this feature to add new information. It is strictly to continue with an existing partial documentation.
Cancel: Allows you to cancel the documented information. Event status will appear as canceled once the change is accepted (saved).
Note: For Allergy/Adverse Reaction assessments more than 24 hours old, or where a more recent assessment exists, you should start a new Allergy/Adverse Reaction assessment rather than correct or supplement. This will ensure a thorough audit trail.
The Patient Care Schedule is also accessed to process events or procedures have not been completed. For example, scheduled transfers and discharges can be processed, or conditional orders can be activated.
1. Locate the incomplete event/procedure, which will be in black text.
2. Select the event/procedure and click OK.
3. Choose the Document button.
4. Complete the required field(s).
5. Accept your documentation.
See topic Scheduled Transfer and Scheduled Discharge for more information.