
For the latest updates, see EPR Release Notices.
For EPR related videos, check out Digital Education's YouTube Channel.
For the latest updates, see EPR Release Notices.
For EPR related videos, check out Digital Education's YouTube Channel.
Scheduled and Unscheduled Discharges
Covered in this topic:
A scheduled discharge is a planned discharge and therefore requires a physician’s order (This must be done in the Order Entry functionality).
1. Once an order has been created, go into the Patient Care Schedule. Select the order for Discharge (ADT: Discharge) and click OK.

2. Choose (D) Document.

3. Enter the date and time that the discharge took place and click OK.

4. Depending on the type of visit you are discharging, you will get different options for Discharge Type. Select the discharge type and click on OK.
For example:
Discharge type options for OP Visit:

Discharge Types for CP Visit:

5. Complete remainder of the form by selecting Discharge Options or entering free-text and click OK.
6. Choose (A) Accept.
The Unscheduled Discharge function is generally available to staff with administrative access. A physicians order is not needed. An example where this is used would be if the patient is deceased or if they left without a physician's order.
1. From the Patient Desktop, ADT tab, click Unscheduled Discharge.

2. Enter the date and time the unscheduled discharge was performed and click OK.

3. Select the Discharge type option and click OK.

4. Complete remainder of the form by selecting Discharge Options or entering free-text and click OK.
5. If the Discharge Type is "Deceased" you must verify patient expiration by choosing (Y) Yes.

6. Next, a form must be completed. The fields in bolded black are mandatory. Choose the appropriate option for Autopsy Consent.

7. Choose the appropriate option for Coroner's Case.

8. Once documentation is complete, Choose (A) Accept to save.
To add details of the patient's death, use the Edit Date of Death option.
1. From the Patient Desktop, select the ADT tab and click Edit Date of Death link.
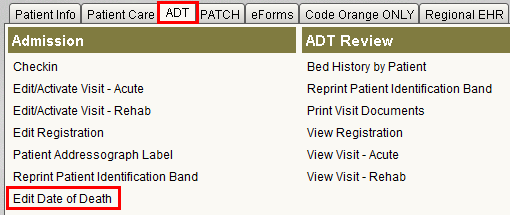
2. The standard registration screens will now have a new, 7th screen called Medical Record Numbers. Select that screen and click OK.
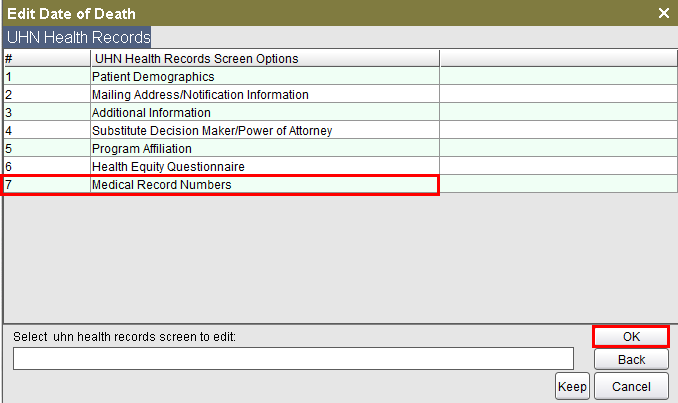
3. The Date/Time of Death field cannot be edited. Select a field to add death details (3, 4 or 5).

a. The Death Indicator field only has one option. If correct, type number 1 and click OK.

b. The Death Info Source field has multiple options. Select the appropriate option from the list and click OK.
Note: when picking an option, such as Hospital___, the underlining indicates more information will be required.
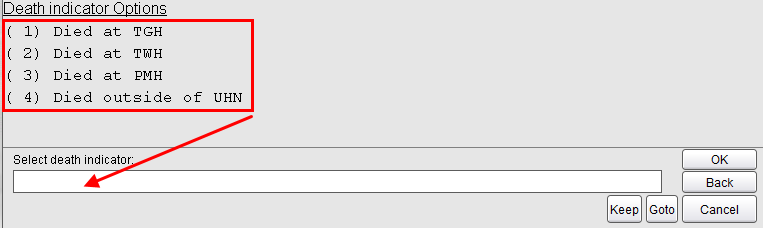
c. The Historial Death Indicator field only has four options. If applicable, type the correct number from the list and click OK.
4. Once all edits have been added, click OK until you see the Accept button. Click Accept to save your work.