The Multiple Block functionality allows you to create multiple recurring blocks on the Appointment Book, indicating that a clinician (or resource) is unavailable for multiple days (or weeks).
· Example: A clinician (or resource) is away on vacation or at a conference for several days.
· This topic describes a practitioner block, as this is the most commonly used functionality across UHN. If blocking for an equipment or room resource unit in PHS, make your selections as applicable.
· Step 1 – Open the Block Maintenance Functionality
· Step 2 - Add the Resources: the Practitioner (or Equipment or Room)
· Step 3 – Define the Pattern: Enter the Block Dates
· Step 4 – Check the Newly Created Blocks on the Appointment Book
· How to View, Edit and Delete your Block Entries
· Tips for Editing and Deleting Blocks
1. Launch the Allscripts Pathways Healthcare Scheduling [Programs] window.
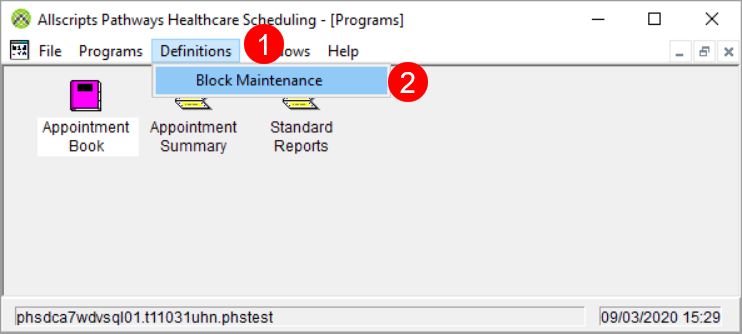
1 Select Definitions
2 Select
Block Maintenance
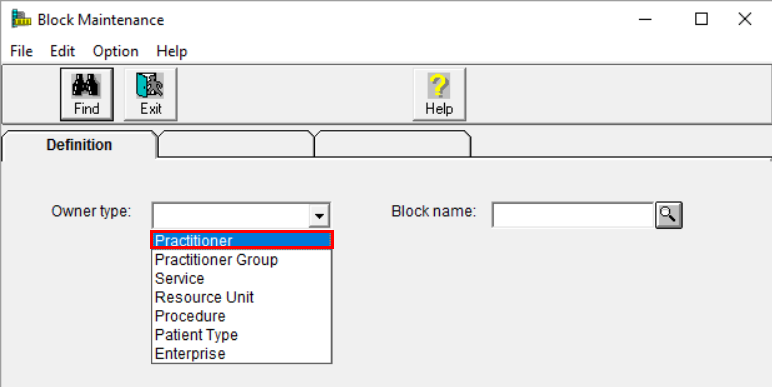
2. From
the list that appears, select Practitioner.
Note: To put a block on all the practitioners (or resources) in your unit,
select Resource Unit.
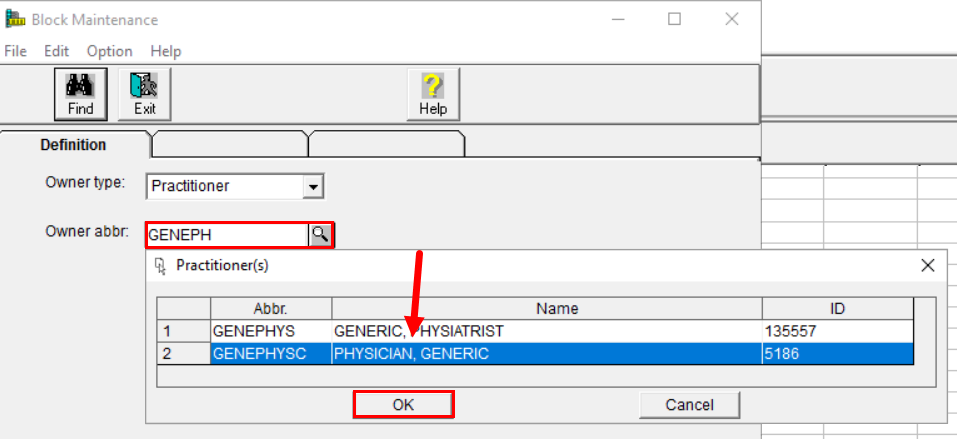
3. Type the first few letters of the practitioner’s name and click the magnifying glass. Select the desired practitioner. Click OK to continue.
Go back to: How to View, Edit and Delete your Block Entries
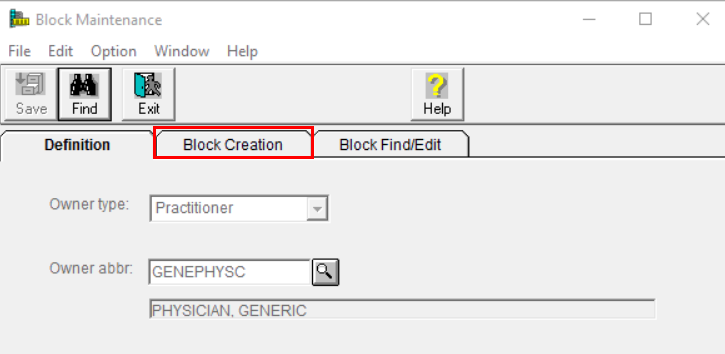
4. Select the Block Creation tab.
5. Click on the Add Resources button.

6. The Reserve Resources for Block Creation screen will open.
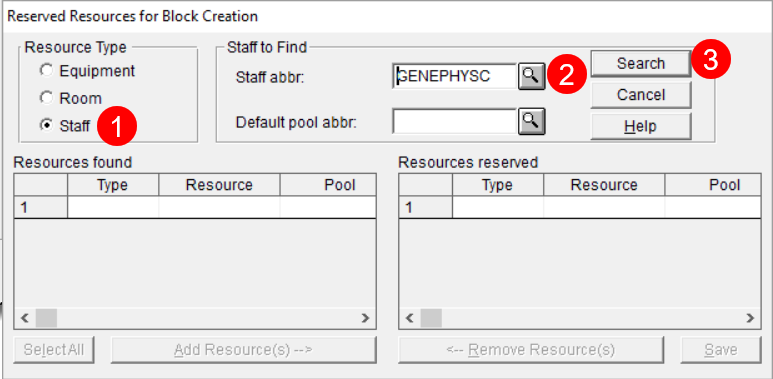
1 Select the Staff radio button (or applicable resource).
2 Enter the practitioner abbreviation and click the magnifying glass (or applicable resource).
3 Click the Search button.
7. Once you have clicked the Search button, additional fields become available.
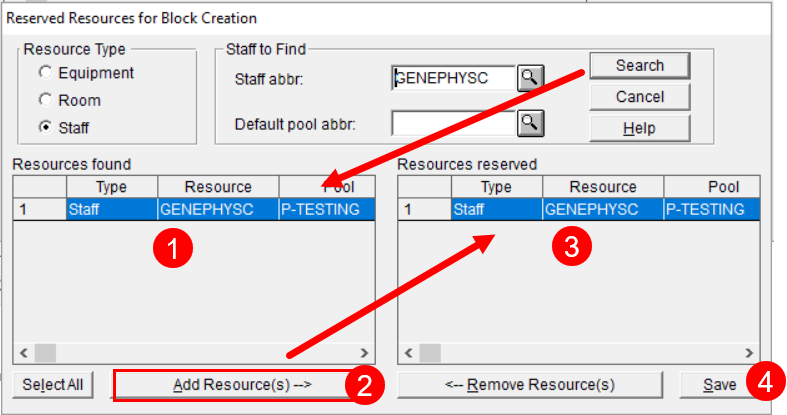
1 The practitioner’s abbreviated name (or resource) appears on the Resources found column, on the left side.
2 Click the Add Resources button.
3 The practitioner’s abbreviated name will now move to the Resources reserved column, on the right side.
4 Click the Save button to close this window.
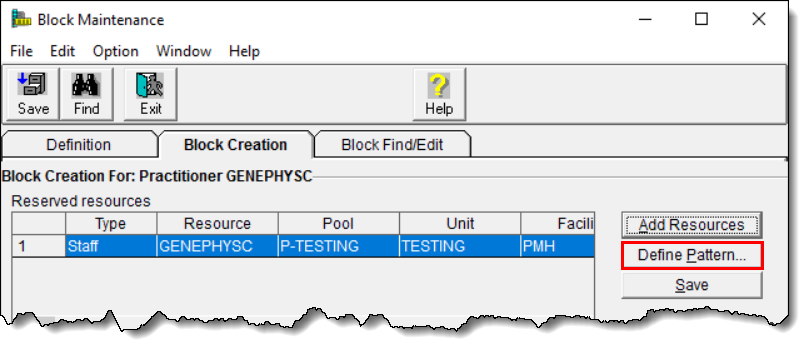
8. The Block Creation window returns. Click the Define Pattern button.
9. The Define Pattern window appears.
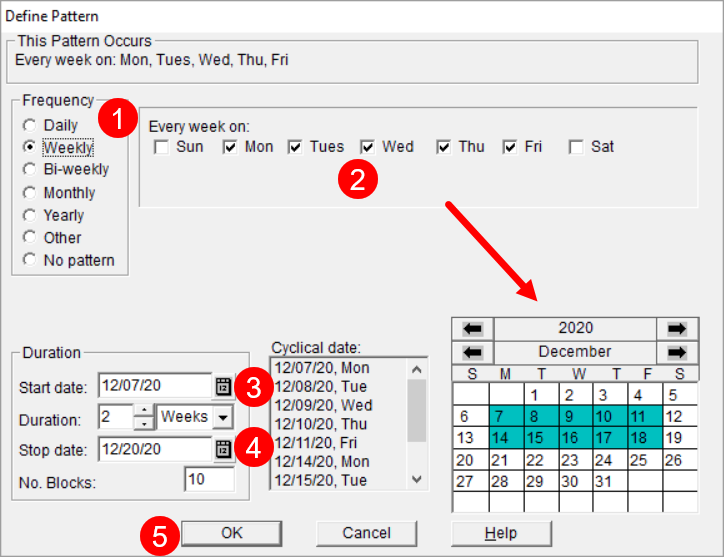
1 Select the desired frequency.
2 Select
the days. Different options will appear in this section,
depending on what you have selected on the Frequency screen.
Note: The options that appear are similar to booking a recurring
meeting, when using Outlook.
3 Select the Start Date.
4 Select the Stop Date. You can also use the Duration and No. Blocks options. The dates that you select will now display in green on the calendar at the far right.
Double check that you have selected the correct dates on the calendar.
5 Click
OK to close this window.
10. The Block Creation window returns.
You can double-check all of your dates by looking under the Block date(s) list, in the bottom right corner.
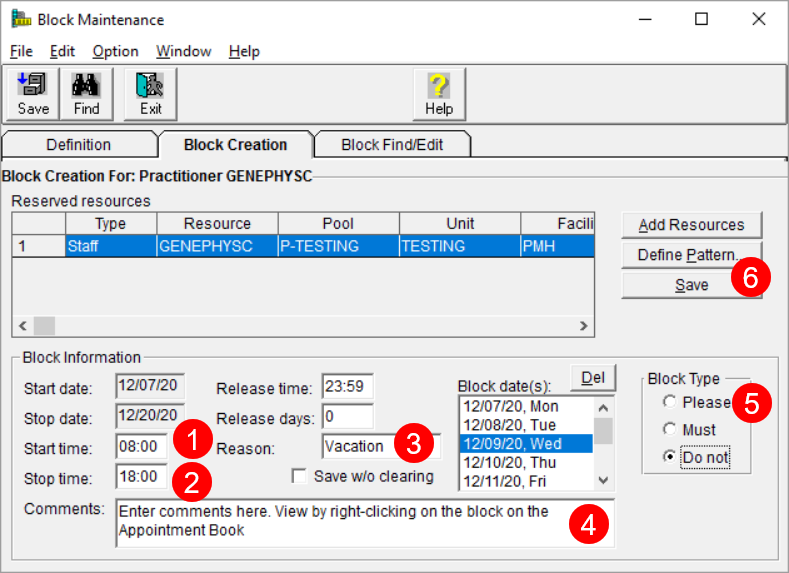
1 Enter the Start time.
2 Enter the Stop time.
3 Enter the Reason. E.g. vacation, conference, meeting.
4 Optional: Enter
a comment. To view comment on Appointment Book, right
click on the block text and select edit.
Important: This comment will appear on all of the multiple blocks in the
set.
5 Select the Block Type. Use the Do not block when a practitioner is away. e.g. Vacation, conference etc.
See the Creating Single Blocks topic for more information about blocks, including Block Types, Release time and Release days.
6 Click Save.
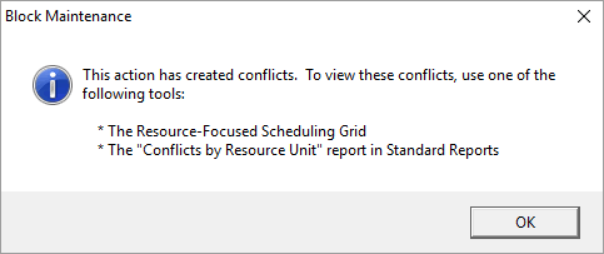
11. If
an appointment has been scheduled during the time that you have
blocked, a Block Maintenance conflict screen will
appear.
Important: Reschedule the appointment as necessary.
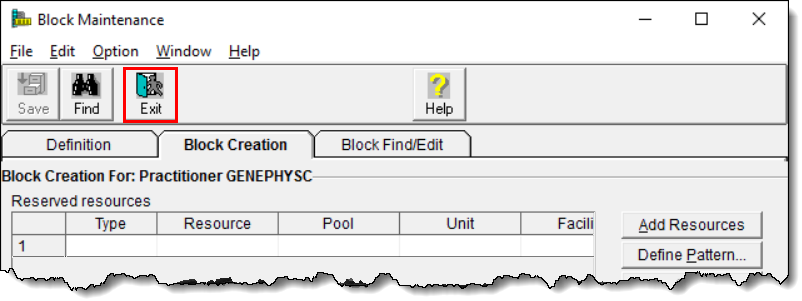
12. Click the Exit button.
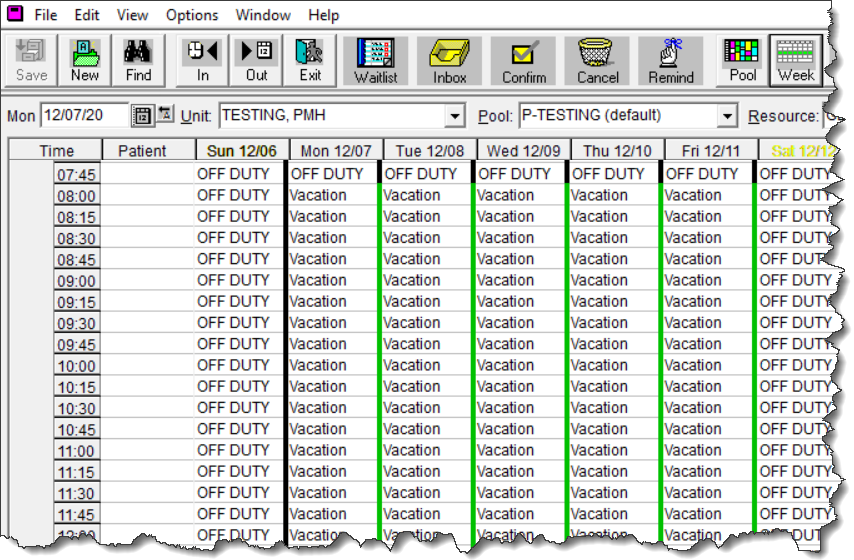
13. Open the Appointment Book and check the new created blocks for accuracy.
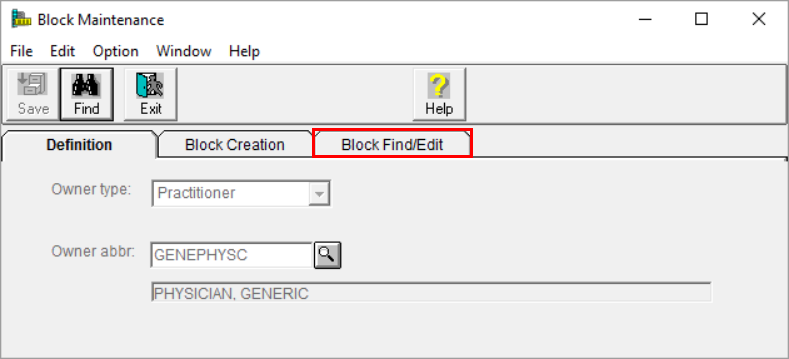
1. Follow Step 1 above (Creating Multiple Blocks) to open the Block Maintenance Window and find your practitioner (or resource).
2. Select the Block Find/Edit tab.
3. On the Block Find/Edit tab, enter the practitioner (or resource) name.
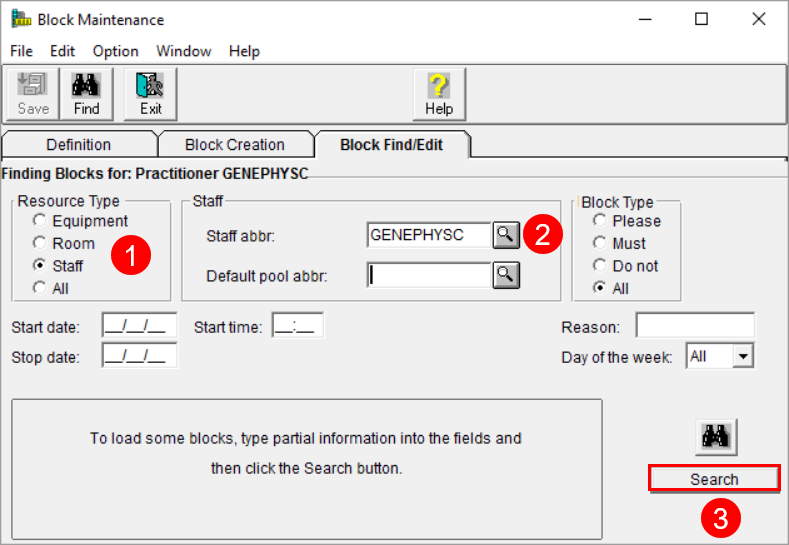
1 Select the Staff radio button. (or applicable resource)
2 Enter the practitioner abbreviation and click the magnifying glass. (different options will present if you selected a different resource)
3 Click the Search button.
4. All of the practitioner (or other resource) blocks appear.
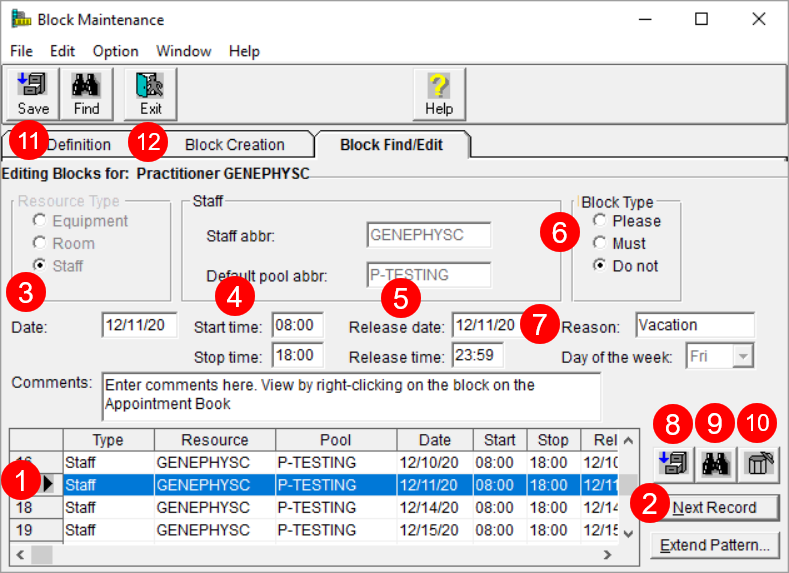
1 A selected block – You may edit/delete a block highlighted in blue.
2 Next Record – Moves to the next record on the block list.
3 Date – Changes the date of the selected block.
4 Start time/Stop time - Changes the start/stop time of the selected block.
5 Release date/time – Changes the date/time of block removal from Appointment Book.
6 Block type - Changes the block type. Note: UHN only uses Please and Do Not blocks. UHN does not use Must blocks.
7 Reason – Changes the reason for the block (text on the Appointment Book).
8 Save – Save changes made on the selected record.
9 Search – Searches for a new practitioner (or other resource).
10 Delete – Deletes the selected record.
11 Save – Saves changes.
12 Exit - Closes the Block Find/Edit screen
· Use the Block Find/Edit window to edit or delete multiple blocks.
· To edit a block, select the block from the block list (at bottom of screen) and edit the block information displayed above the block list.
· Use the up/down arrows on your keyboard to navigate quickly through the block list (at bottom of screen).
· This is the quickest way to edit/delete multiple blocks.
See the Creating Single Blocks topic for more information about blocks,