There are three ways to reschedule an appointment in PHS. You can use the Right Click Menu, manually drop and drag the appointment to a new date on the Appointment Book, or use the Find Menu. Rescheduling the appointment in PHS, will also automatically update the EPR visit. There is no need to take any rescheduling action in the EPR.
If you reschedule an appointment for a patient who has subscribed to the myUHN Patient Portal, they will get an email notification. Additionally, if you inadvertently drag an appointment from the Appointment Book to the Scheduling Package, and then back to the Appointment Book, the patient will also get an alert in the Patient Portal.
Rescheduling Single Appointments video (5:50)
Rescheduling Single Appointments video transcript
· Method 1: Rescheduling Using the Right-Click Menu
· Method 2: Dragging and Dropping the Appointment to a New Date
· Method 3: Rescheduling Using the Find Menu
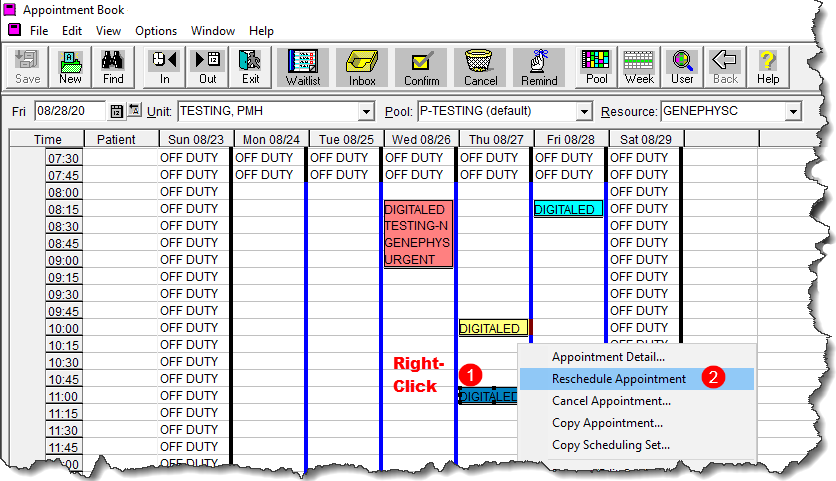
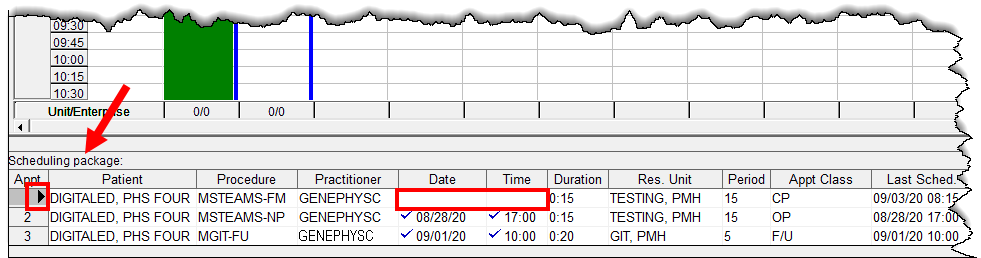
1. Right-click inside the appointment box and select Reschedule Appointment.
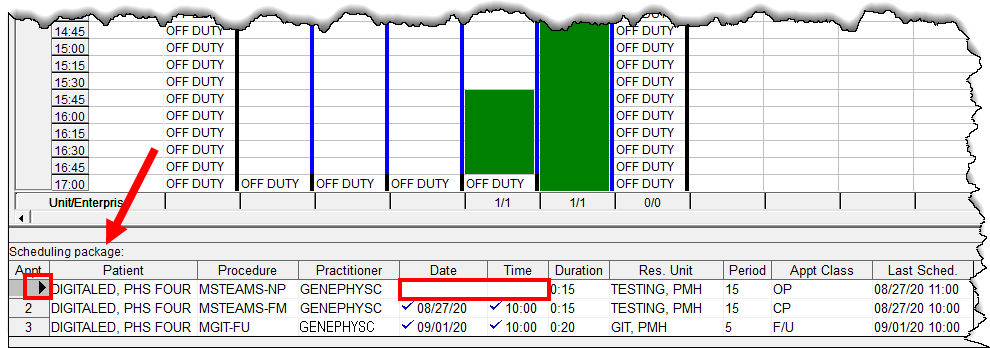
2. Your appointment is now in the Scheduling Package at the bottom of the Appointment Book window. A black arrow in the bottom left corner is pointing to the appointment that you are in the process of rescheduling - notice that area under the Date and Time columns are blank. Notice also that there is Green Space on the Appointment Book.
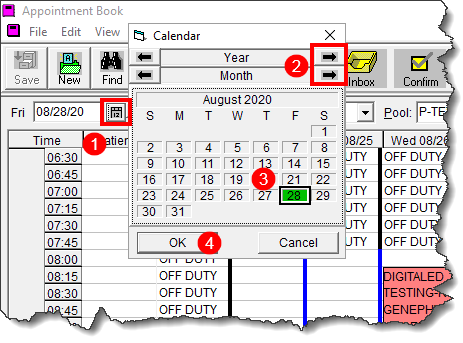
3. Use the Calendar button in the top left corner of the Appointment Book window to select a new date for the appointment.
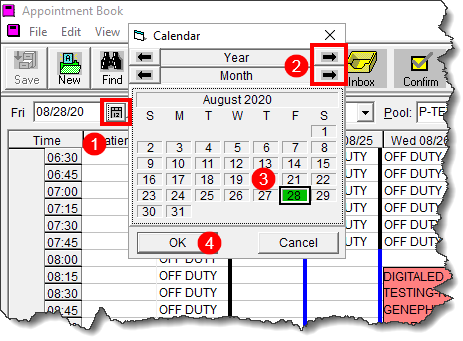
1 Click on Calendar button.
2 Use the arrows at the top of the calendar to navigate to a new date for the appointment.
3 Select the desired new date.
4 Click on the OK button at the bottom left of the calendar.
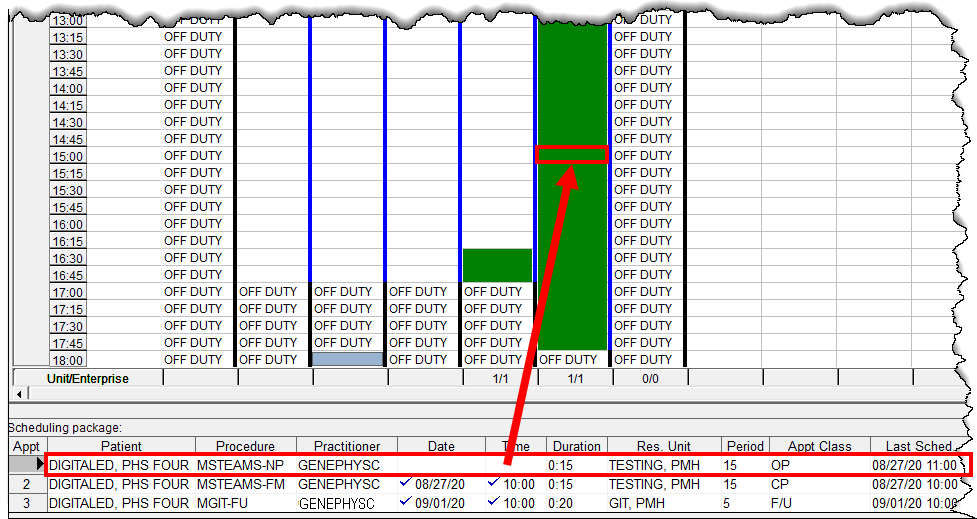
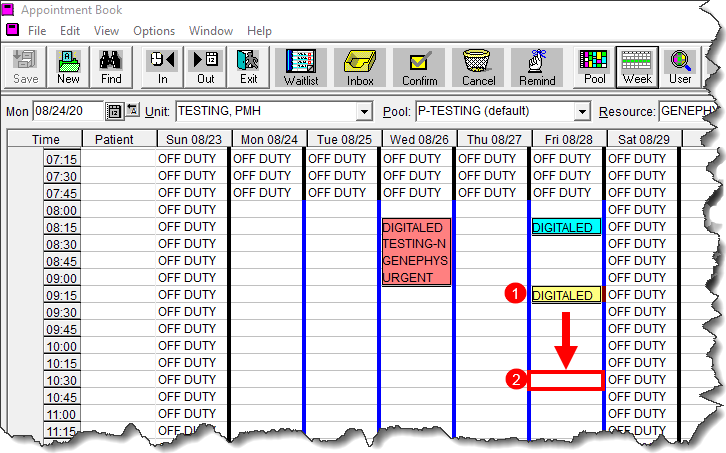
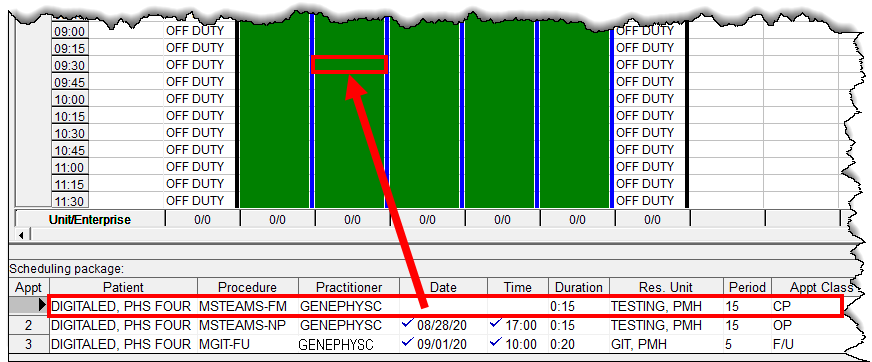
4. Drag and drop your appointment from the Scheduling Package to the desired new timeslot on the Green Space within the appointment grid.
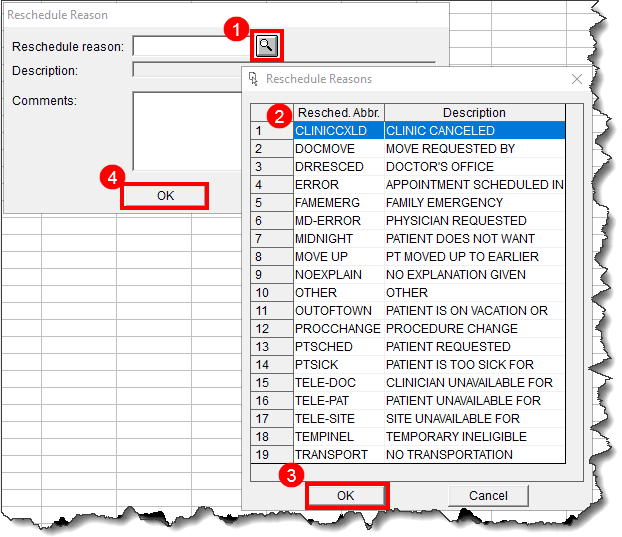
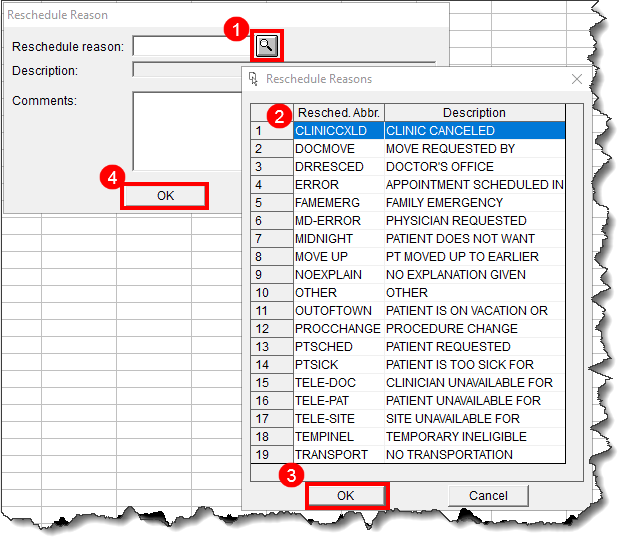
5. Indicate a reason for rescheduling this appointment.

1 Click on the magnifying glass on the right side of the Reschedule reason field.
2 Select the most accurate reason from the list of Reschedule Reasons.
3 Click OK on the bottom left of the List window.
4 Click OK on the bottom left of the Reschedule Reason window.
The second way to reschedule an appointment is by dragging and dropping the appointment from one date and time, to a new date and time. The steps to following when rescheduling an appointment to a different time on the same day, is different as compared to rescheduling an appointment on a different day.
If you are rescheduling an appointment to a different time on the same day, you may drag and drop the appointment box from one timeslot to another one.
1 Click inside the appointment box and hold the mouse button down.
2 Drag it to the new appointment time slot on the same day, which should be in the same column.
1. If you are rescheduling the appointment to a different day, you must not drag the appointment box from one column to another, because the appointment information will not get updated in EPR.
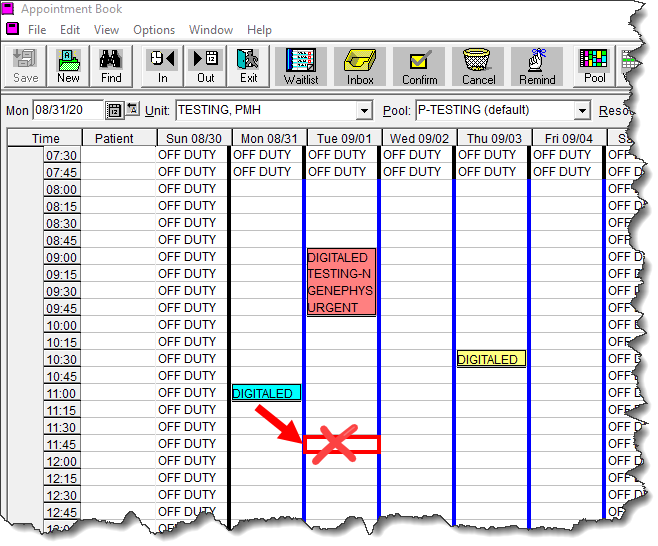
2. Instead, you must drag the appointment box from the Appointment Book to the Scheduling Package. Then, from the Scheduling Package, you would drag the appointment to the new timeslot on the Appointment Book.

1 Click inside the appointment box and hold the mouse button down.
2 Drag the appointment box to the bottom of the Appointment Book window and drop it into Scheduling Package.
3 Click on the appointment with a blank date and time and hold the mouse button down.
4 Drag the appointment to the desired timeslot on the Green Space within the Appointment Grid.
3. Indicate a reason for rescheduling this appointment.
1 Click on the magnifying glass on the right side of the Reschedule reason field.
2 Select the most accurate reason from the list of Reschedule Reasons.
3 Click OK on the bottom left of the List window.
4 Click OK on the bottom left of the Reschedule Reason window.
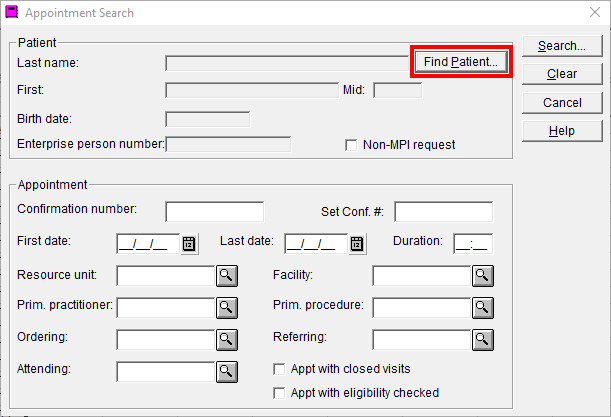
The third method for rescheduling is using the Find Menu. This will enable you to find your patient and their list of appointments.
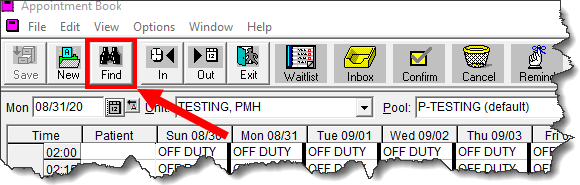
1. Click on Find at the top left corner of the Appointment Book window.
2. On the Appointment Search window, click Find Patient at the top right corner.
3. Search for your patient
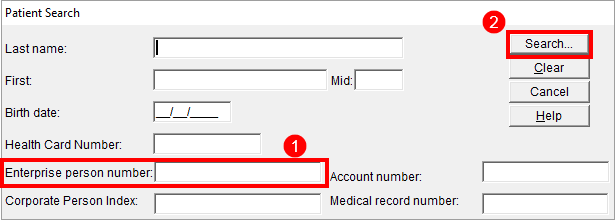
1 Enter your patient’s MRN number into the Enterprise Person Number field at the lower left area of the window.
2 Click on Search in the top right corner.
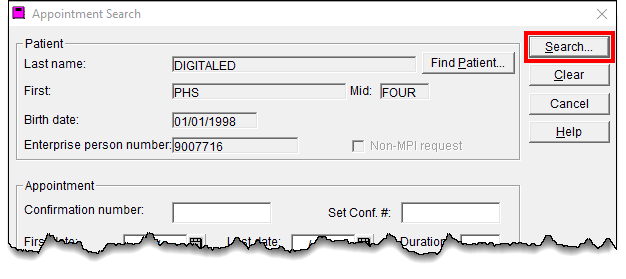
4. Confirm that you have the correct patient.

1 Verify the information in the Patient Search Results window (check the patient’s name and MRN number).
2 Click on OK in the top right corner.
5. Your patient’s information appears in the top section of the Appointment Search Window. Click Search in the top right corner.
6. Your patient’s list of appointments appear on the left area of the Appointment Search Results window. To the right, there is a menu with all the options that you can apply to the highlighted appointment on the left.
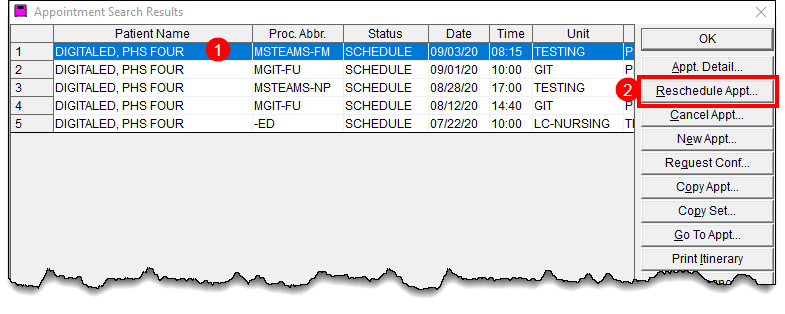
1 Select the appointment you want to reschedule.
2 Click Reschedule Appt. from the menu on the right.
7. Your appointment is now in the Scheduling Package at the bottom of the Appointment Book window. A black arrow in the bottom left corner is pointing to the appointment that you are in the process of rescheduling - notice that area under the Date and Time columns are blank. Notice also that there is Green Space on the Appointment Grid.
8. Use the Calendar button in the top left corner of the Appointment Book window to select a new date for the appointment.
1 Click on Calendar button.
2 Use the arrows at the top of the calendar to navigate to a new date for the appointment.
3 Select the new date.
4 Click on the OK button at the bottom left of the calendar.
9. Drag and drop your appointment from the Scheduling Package to the desired new timeslot on the Green Space within the appointment grid.
10. Indicate a reason for rescheduling this appointment.
1 Click on the magnifying glass on the right side of the Reschedule reason field.
2 Select the most accurate reason from the list of Reschedule Reasons.
3 Click OK on the bottom left of the List window.
4 Click OK on the bottom left of the Reschedule Reason window.
· Do not reschedule past appointments because EPR will not be updated.
· If you need to reschedule a past appointment, cancel it and create a new appointment.
· Only reschedule appointments booked from today and onwards.
· Do not drag an appointment from column to column. Always use the recommended rescheduling methods.
· Rescheduling the appointment in PHS, will also automatically update the EPR appointment. Therefore, you do not need to additionally reschedule an appointment in EPR. The interface goes from PHS to EPR.
· Many data quality issues come from staff incorrectly rescheduling appointments in PHS.