When you create an appointment in PHS, you automatically create a pending visit in the EPR. It is very important that you activate this pending EPR visit. The best practice is to activate the visit in EPR, as this is where funding takes place. If you do not have EPR, and only have PHS, there is an alternative workflow. Note: If you have EPR, do not use the alternative workflow, as there is more margin for error.
· An activated EPR visit indicates that the patient attended their appointment at UHN.
· A pending EPR visit indicates that the appointment has not yet happened, or that the patient did not attend their appointment.
· We cannot report or obtain funding for pending EPR visits, only activated visits.
· The best practice is to activate the pending visit in EPR, as soon as the patient arrives to the clinic, for accuracy.
· At the end of the day, check your clinic list in EPR to ensure all the visits have been activated for the patients that attended for the day.
1. Create the appointment in PHS, which creates a pending visit in EPR.
2. Upon the patient’s arrival to clinic, activate the pending visit in EPR, following the ADT-Visit Activation topic in the EPR eManual.
3. At the end of the day, double check that you have activated all of that’s day’s visits in EPR.
The best practice is to activate the visit in the EPR, as this is where funding actually takes place and you can ensure accuracy. However, if you do not have access to EPR, you can activate the appointment from PHS.
o Step 1: Create a New Visit in EPR.
o Step 2: Perform the Appointment Tracking Function
· Checking Your That All Your Appointments Have Been Arrived
· Appointment Tracking Best Practices
In PHS, the Appointment Tracking functionality will interface with EPR and activate the pending visit. Reminder: Only use this method if you do not have access to EPR. You must be very diligent in using this method, as there is more margin for error. Always check to ensure that all your appointments have been arrived accurately.
· Follow the steps for Appointment Tracking in PHS for all patients who attended their appointment for the day.
· After using the Appointment Tracking functionality in PHS, there is no indicator or mark on the appointment, indicating that you have completed this task.
· It is best practice to use the Appointment Tracking functionality at the end of the day for all patients who attended their appointment. This simple action will help you keep track of which patients you have arrived in PHS and will improve your accuracy on this very important task.
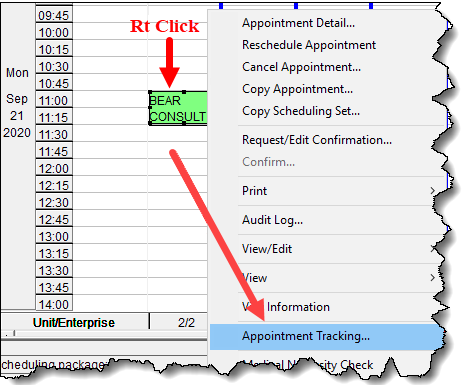
1. Right click on the appointment to open the Right Click Menu. Select Appointment Tracking.
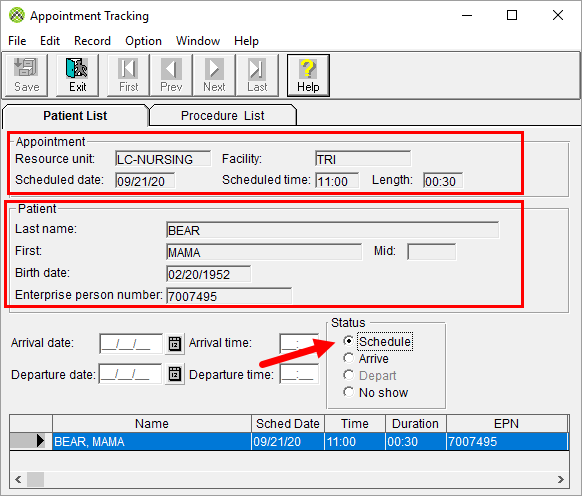
2. The Appointment Tracking Screen opens. At the top of the screen, you will find both the appointment and patient information details.
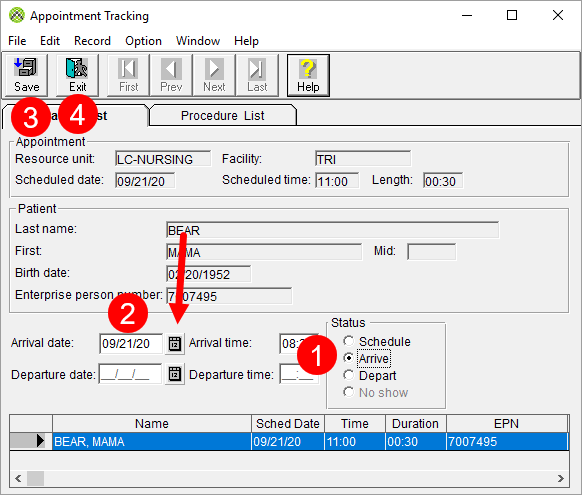
In the bottom right corner, under the status section, the schedule button is selected. This is the default and indicates that the patient has not yet arrived.
3. Arriving your patient is easy – it is just three clicks!

1 Select Arrive. Notice that the arrival date and time will populate once you select the Arrive button. The time does not matter, as the appointment time does not interface to EPR. Important: The arrival date should be the same date as the appointment date. The date that automatically populates will be the day that you arrive the appointment (the current date).
2 Select Save.
3 Select Exit.
If you need to correct the Arrive date, follow these two steps:
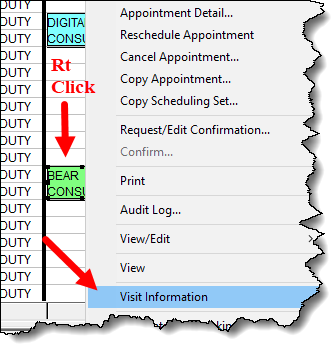
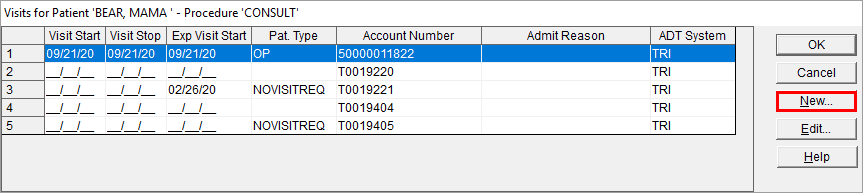
1. Right click on the appointment to open the Right Click Menu. Select Visit Information. Note: We use these same steps when we create the visit component for a new appointment.
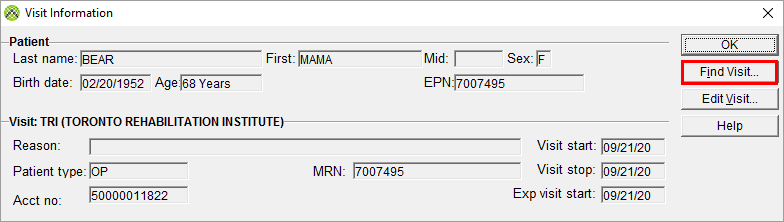
2. Select the Find Visit button.
3. Select the New button.
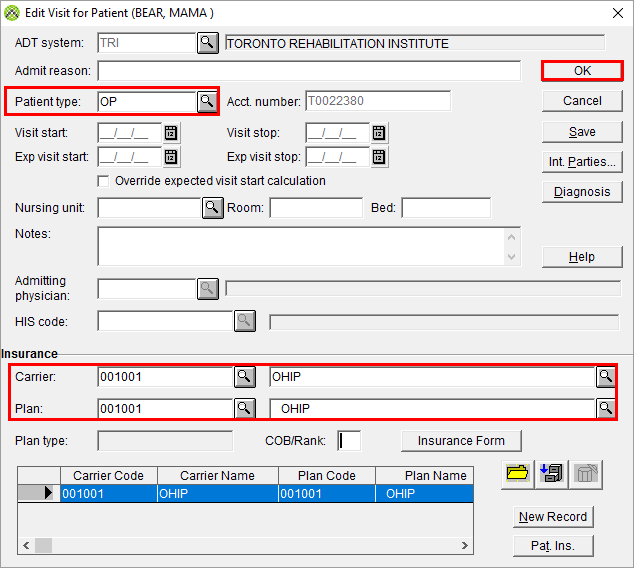
4. Enter the Patient Type and Insurance information, as we normally do when creating a new appointment. Click OK to continue.
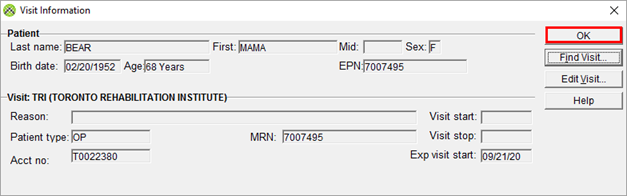
5. Click OK to close the Visit Information screen. A new visit has now been created.
1. On the Appointment Tracking screen, reset the status to Schedule to clear the original date.

2. Now you can enter the new Arrive date.
1 Select Arrive.
2 Click on the calendar icon to change the Arrival date. The Arrival date should match the Appointment date.
3 Select Save.
4 Select Exit.
· At the end of every day (or as necessary), double check that all your appointments have been arrived in PHS, for all the patients who attended clinic that day.
· There is no indicator on the appointment that indicates that the appointment has been arrived. If you open the Appointment Tracking window on an appointment, you can check a single appointment. This is very time consuming, as you must check each appointment.
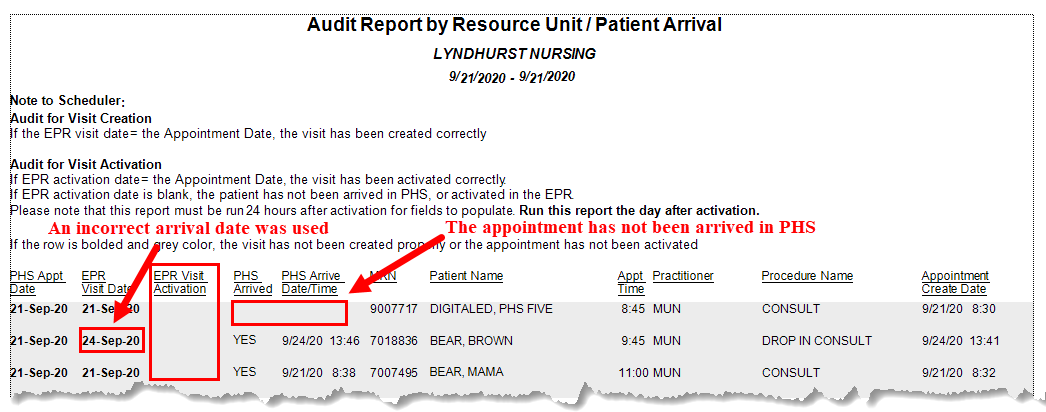
· A quicker way to check the arrival status of your entire unit is to run the Audit Report by Resource Unit/Patient Arrival report. This report will list all the appointments in your unit, for the days that you specify.
o This report will instantly indicate if you have arrived your patients in PHS, and if you have used the correct date.
o The EPR Visit Activation column will populate 24 hours after you have arrived your patient in PHS. This is because it takes up to 24 hours for the PHS arrival field to interface to EPR. To check if the visit is active in EPR, run the report 24 hours after you have arrived your patient in PHS.
o For further information on running a report, please see the Generating Reports topic.
· Reminder: If you have EPR, it is best practice to activate the visit in EPR, as this is where funding takes place. Do not PHS for this task, if you have EPR.
· If you only have access to PHS, it is best practice to arrive the appointments in PHS on the actual appointment date.
· Time can be backdated but not future dated.
· If you backdate, it will require more clicks because you must change the calendar date for every appointment. The date that automatically populates will be the day that you arrive the appointment and not the actual appointment date.
· There is no visible indicator or mark on an appointment that has been arrived in PHS. Use the Appointment Tracking functionality at the end of the day for all patients who attended their appointments. This will improve your accuracy and you will be less likely to forget tracking a patient.
· The No Show button is never used and is unavailable and grayed out.
· Only use the Arrive and Schedule buttons.