
For the latest updates, see EPR Release Notices.
For EPR related videos, check out Digital Education's YouTube Channel.
For the latest updates, see EPR Release Notices.
For EPR related videos, check out Digital Education's YouTube Channel.
Patient Search
Covered in this topic:
Searching by Clinic Patients List
There are a variety of ways to search for patients within the EPR. The methods available to you will depend on your role and/or type of access (i.e. physician, nurse, administrative, etc.). Most options allow you to search by Patient ID, which is a demographic search using the following identifiers:
Last name, first name: e.g. 'Smith, Jane';
Last name only: e.g. 'Smith';
Wild card: When searching by name, the wild card allows you to do a partial search using the dash symbol. e.g. 'smit-'
UHN Medical Record Number (MRN): e.g. '123123';
Ontario Health Card number: if your unit has a swipe device to validate the OHIP card, use this method. Otherwise, manually enter the letter "o" before the number so the system searches for an Ontario Health Card number, and not an MRN. e.g. 'o1231231231';
Visit number: you must enter the letter "v" before the number so the system searches for a visit number. e.g. 'v5000004123'
To narrow your search, use one of the Search options below (this list is not exhaustive):
Search Option
|
Description |
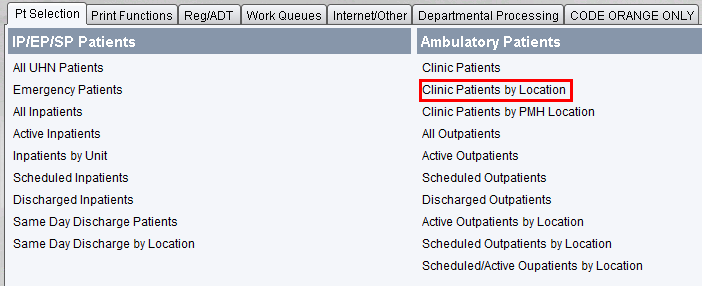
All UHN Patients |
Search the entire UHN patient database by Patient ID
|
Clinic Patients |
Search for a clinic patient by Patient ID
|
Clinic Patients by Location |
Choose from a list of clinic patients by location
|
Clinic Patients by PMH Location |
Choose from a list of clinic patients by PMH location
|
Emergency Patients |
Search for an Emergency patient by Patient ID
|
Inpatients by Unit |
Choose from a list of all patients based and displayed by unit
|
Outpatients |
Search for an outpatient by Patient ID
|
*My Active Patients (Clinic, Outpatients, etc…)
|
Search for your active patients by Patient ID |
*My Discharged Patients (Inpatient, Clinic, etc…)
|
Search for your discharged patients by Patient ID |
*These "My" search options only appear for Physicians, Sr. Med Students and APNs, and contain three types of patients: those who are assigned to you based on your service, patients you have assigned to yourself, and patients with orders or results that require your electronic signature (authorization).
1. Click on a Search Option, such as All UHN Patients.

2. Type in a Patient ID, using any identifiers in the above list (e.g., Last name, MRN) and then press Enter on the keyboard.

3. Depending on what ID you used to search for the patient, the patient’s visit page will appear (i.e. if you searched for MRN) or a patient list with everyone who matches your search criteria will appear. In this case a patient list appears which displays key information about each patient to the right of the name column. Click the patient you wish to work with and then click the Goto Patient(s) button at the bottom right hand corner of the screen (or you can double click) on the patient name.

4. A list of all the patient's UHN visits is displayed. The columns show the following information:
Visit Number - unique number assigned to visit
Start Date - when they entered the hospital (visit start)
Stop Date - when they left the hospital (visit end)
Specialty - the specialty of the physician associated with the visit
Physician - attending physician associated with the visit
Visit Location - the location of that visit which is prefixed with the site acronym (BC, UC, LC, TW, TG, PM)
Type of Visit - IP, SP, CP, OP, EP, RP, HH
Status - the current status of the visit (pended visit, active visit, discharged visit, etc.)
Facility - which database the patient's visit is stored in (i.e. UHN or old retired databases called TWH, TRI)
If you see any greyed out visits, they will be historical records that are not accessible from patient search. If you need to access greyed out visits, you can use the top toolbar icons for Chart Review by Patient or TW or TR Old Visits and then follow the same steps below to search.
Click on the visit you wish to view, then click on the Goto Visits button in the bottom right hand corner of the screen.
Note: You may click on the Return To Patient List button to select or search for a different patient.

5. If it is the first time you have accessed this patient's record on a given day, then a warning will appear that indicates that chart access is now being recorded. If this is indeed the patient you wish to work with, then click on the Yes button.

One of the common ways to search for patients is by the Inpatient by Unit lists.
Follow the steps below:
1. From the main desktop, click on Inpatients by Unit from under the IP/EPSP Patients banner.
2. The Inpatient by Unit (Search) screen will appear. By default this list will display patients on the unit where the computer is physically located, and will be sorted by the Location column (indicated by the upward pointing arrow). The location of each patient is prefixed with the site acronym (BC, UC, LC, TW, TG, PM). To change the sort order, click on one of the sort headings.

If the default unit is not correct, click on the Unit drop down arrow to show a list of available units, then click on the appropriate unit.
3. Once the appropriate unit is displayed, click on the patient record you wish to work with. To select multiple patient records hold the CTRL key on the left hand side of the keyboard and click on the patient names you wish to select. Once the patient record(s) are selected, click Goto Patients.
Note:Most
columns are self-explanatory however, a description of those that need
more explanation have been added through text boxes in the task area below.

4. If you are accessing a patient’s record for the first time, on any given day, a warning appears indicating that chart access is now being recorded. If this is indeed the patient record you wish to access, click on the Yes button.

5. The patient’s desktop will now appear.
Searching by Clinic Patients List
The Clinic Patients by Location list is a quick resource to find all of a clinic’s patients, rather than searching for each one individually. From the list, you could click a patient name to open their chart and activate a visit. You can use this list to check a patient’s visit status. It is also a helpful resource to review historical clinic patient lists. From here, you may correct a visit status or other inaccuracies.
Important: At the end of the day, review the clinic list to ensure that all visits are marked either as active or as no show. Reschedule or cancel any pending visits, as UHN only receives funding on active visits.
1. From the Main Desktop, Pt Selection tab, click on Clinic Patients by Location.
2. Go to the Location field, and click on the Search button.

3. Select your clinic name from the list.
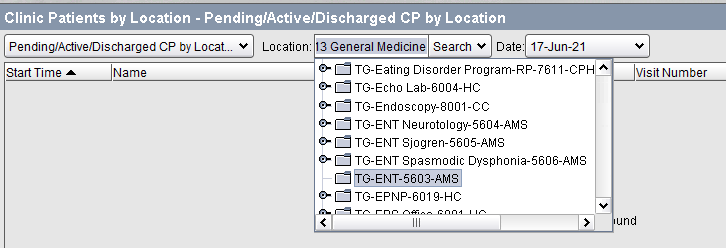
4. Select the appropriate date and the patient list for that date will appear. The default date is today’s date.

5. In the top left corner, click on the Pending/Active/Discharged CP by Location button, to reveal various options.

6. Click on the desired option. Commonly used options are:
· Pending Clinic by Location - a list of the patients that you are expecting for the selected date
· Active Clinic by Location - a list of the patients that have had their visits activated
· Other Options include lists of discharged, cancelled, and no show patient visits
Note: You may click and change to other options without having to perform steps 1-5 again.