For the latest updates, see EPR Release Notices.
For EPR related videos, check out Digital Education's YouTube Channel.
For the latest updates, see EPR Release Notices.
For EPR related videos, check out Digital Education's YouTube Channel.
Visit Creation
Covered in this topic:
A patient is registered only once (i.e. one MRN only), but a visit is created each time the patient comes to the hospital for an appointment.
To access the Visit Creation links:
1. Visit the Reg/ADT tab under EPR’s Main Desktop (Reg/ADT stands for Registration/Admission, Discharge, and Transfer).
Note: EPR options and location of options may vary dependent on your role and/or type of EPR access.
Acute Care Registrars
|
Toronto Rehab Registrars |
|
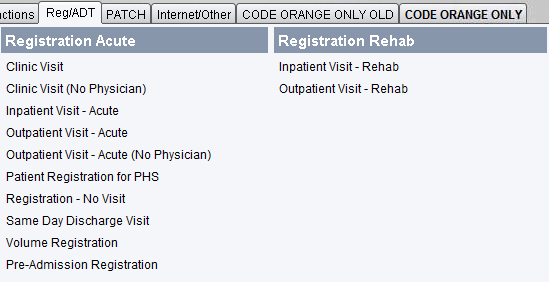
You will see two banners: Registration Acute and Registration Rehab.  |
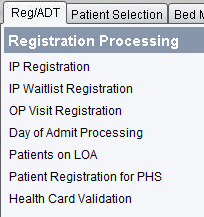
You will see various registration options under the Registration Processing banner.  |
The following are detailed descriptions of common visit types:
Clinic Visit (CP) - When patient is seen by a physician or a nurse in a clinic (they may or may not also get tests done).
Inpatient (IP) - acute - When patient needs to stay overnight in the acute sites due to a medical procedure, surgery or condition (directive always comes from the physician).
Inpatient (IP) - Rehab - When patient needs to stay overnight at Toronto Rehab due to a medical procedure, surgery or condition (directive always comes from the physician).
Outpatient
(OP) - Acute - When patient
comes into hospital for any diagnostic testing such as labs and Medical
Imaging, or other health care professionals other than a physician.
Note: Outpatient (OP) - Rehab
- At Toronto Rehab, OP visits are used for all types of ambulatory
visits.
Outreach Health Visit - Used for Outreach Health visits.
Outpatient Research Visit - When patient is seen by a Research Coordinator (staff) and does not have a physician assigned to the visit.
Same Day Visit (SP) – When a patient has a medical/surgical procedure done and is at the hospital for the day.
Pre-Admission Registration – When a patient needs to visit clinic prior visit/surgery for pre-admission consults/assessment/education. This is also referred to as a pre-admit visit.
RP Visit (RP) - The patient is not physically at the hospital and is associated with referred-in specimens
Hospital at Home Visit (HH) - When a patient is admitted to the emergency department mobile program at Toronto Western Hospital
In addition to the above selections, you may see some additional options attached, such as No Launch and No Physician. Please disregard if your patients have already been registered, as those functionalities are specific to Registration.
Searching for Your Patient
2. Upon selecting an option on the Reg/ADT tab, the next screen will prompt you to Enter patient ID. (Note: For our example, we will be creating a Clinic Visit).
Best practice: (when relevant), first search for the Ontario Health Card number by inserting an O in front of the number in the Transaction Line and click OK. If there is no match found, then search by the patient’s last name, first name.
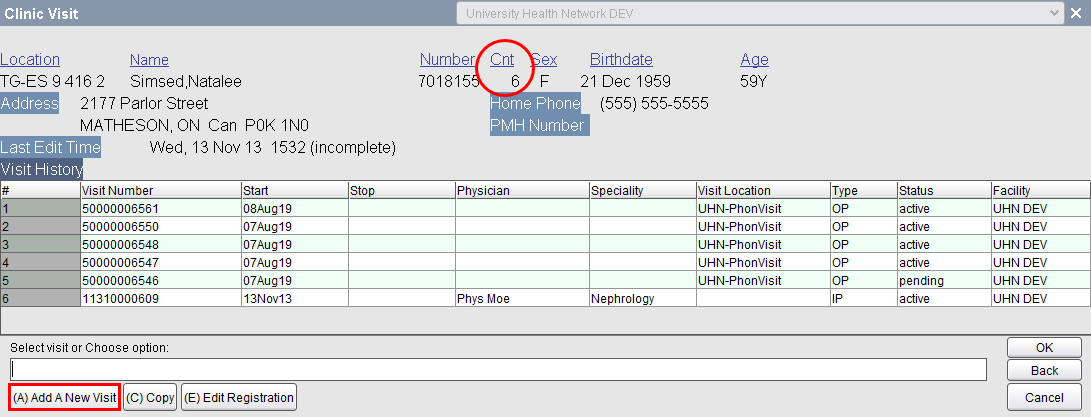
3. Assuming your patient has already been registered, he/she should come up in your search. Clicking on your patient’s name should bring you to their Visit History screen. For our example below, and under Cnt (count), our patient had 6 visits to the UHN hospital. If no visits are listed, it means the patient has had no visits at UHN yet.
4. Choose Add A New Visit.
Note: The visit creation screen/form may slightly differ in title and fields to be completed. Nevertheless, completion of the forms follows the same process.

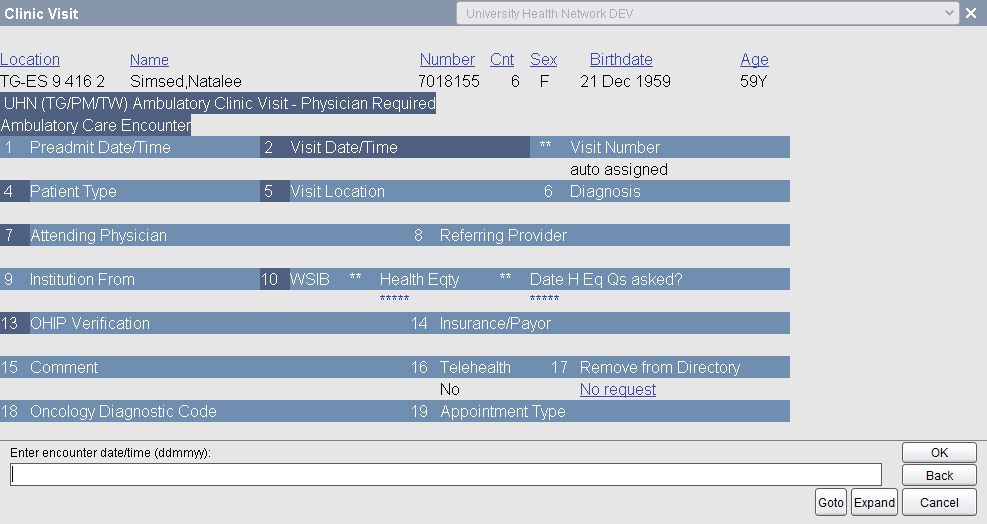
5. This next screen is where you would complete all details to create the new visit. (Reminder: Darkened field numbers indicate mandatory information, however, you should try to input as much information you have on hand as long as it is accurate). This following example is for an Ambulatory Clinic Visit.

This is a description list of some fields you may encounter, depending on the visit type:
Field |
Description |
Pre-admit Date/Time |
Date and time to when the visit was put into pre-admit status. |
Visit Date/Time |
Use the format ddmmyy. |
** Visit Number |
EPR auto-generates this number upon visit creation. |
Patient Type |
Type of patient for this visit.
|
Visit Location |
The clinic/unit patient is visiting. (Note: The Expand button at bottom right will provide a list of clinics available at UHN). |
Diagnosis |
The primary diagnosis of patient during this visit. |
Attending Physician |
You would have to enter in the Attending physician’s name to search and select the appropriate one. Note: This should always be a UHN physician.
|
Program |
(Applicable to Toronto Rehab only) |
Stream |
(Applicable to Toronto Rehab only) |
Sub-Stream |
(Applicable to Toronto Rehab only) |
Referring Provider |
The Referring Provider may receive notifications from EPR, if their name is properly added. Choose Add to search and select the appropriate Referring Provider (physician, Nurse Practitioner, etc. Note: This may or may not be a UHN provider. |
Institution From |
If applicable, you would select the institution from where the patient is from. |
WSIB |
If applicable, you would indicate ‘Yes’ if this is a WSIB claim. (Mostly applicable to TW or TR patients). |
** Health Eqty |
Health Equity Questionnaire (field not applicable) |
** Date H Eq Qs asked? |
Date questionnaire completed (field not applicable) |
OHIP Verification |
This field directly communicates to the Ministry of Health for Ontario Health Card Validation (HCV). During visit creation, you may keep this field empty and refer to when activating a visit.
|
Insurance/ Payor |
Ensure the payor information for this visit is included by: deleting or inserting in the appropriate item. |
Comment |
If applicable, any pertinent information not captured anywhere else in the EPR should be included here for Finance team to review (especially for non-Ontario Health Card patients). |
Telehealth Video Conference? |
Indicate if this is a Telehealth visit. |
Oncology Diagnostic Code |
(Applicable to Princess Margaret only) |
Appointment Type |
Nature of patient’s visit.
|
Brought in By |
Select option best describing who/how patient came with. |
Presenting Complaint |
Select as many present symptoms/complaints you see/hear of patient. |
Notify GP? |
Indicate if Primary Care Provider needs to be notified. |
Bed Ctrl Srv |
Indicate the bed type for this patient (Inpatient). |
Emerg Phys on Duty |
You would have to enter in the Physician on Duty’s name to search and select the appropriate one. Note: This should always be a UHN physician.
|
Remove from Directory |
Select the Privacy level required for this patient during their stay at the hospital and this visit. |
Comment |
Enter in any additional comments good to note for Finance or anyone else that may be of relevance, and if the information is not indicated anywhere else on the EPR. (The field is not available on all Visit types.)
|
6. Upon completion of all (mandatory) fields, EPR will prompt you to Accept to save.
7. EPR will auto-generate a visit number for you.

8. If the patient is not right in front of you, do not activate the visit when prompted. Saving it without activating will simply create a pended visit for activation later.
9. Click (Y) Yes if you need to print reports.
The table below provides descriptions of visit statuses:
| Pre-Admit | An activated pre-admit visit for the purpose of administering tests prior to the actual visit date |
| Pended | Future visit (not activated) |
| Active | Current Visit |
| No Show | Patient missed appointment - no notice given |
| Cancelled | Patient contacted hospital to cancel appointment |
| Discharged | Discharged Visit |
| Closed | The visit can no longer be edited |
The visit status may be viewed on either the Visit History screen or in the Patient Banner on the Patient Desktop.
On the Visit History screen, the Status column indicates the visit status for each visit.

On the Patient Banner, the visit status is displayed beside Location. Active visits display the patient's location.

Note: Active visits display the patient's location.

For more information on Visit Creation see the Patient Registration Resource Centre page on the UHN Intranet.