For the latest updates, see EPR Release Notices.
For EPR related videos, check out Digital Education's YouTube Channel.
For the latest updates, see EPR Release Notices.
For EPR related videos, check out Digital Education's YouTube Channel.
Patient Registration
Covered in this topic:
Mailing Address/Notification Information
Substitute Decision Maker/Power of Attorney
Registration is the creation of an electronic record of the patient’s information, and the collection of the patient’s demographic, contact, physician and health insurance related information. According to UHN Clinical Policy 3.40.009, all UHN patients must be registered into the hospital’s electronic patient registration system, the EPR.
For more information on Patient Registration, see the Patient Registration Resource Centre page on the UHN Intranet.
Note: each patient should only be registered once, but the information should be maintained and kept up-to-date.
To access the Registration links:
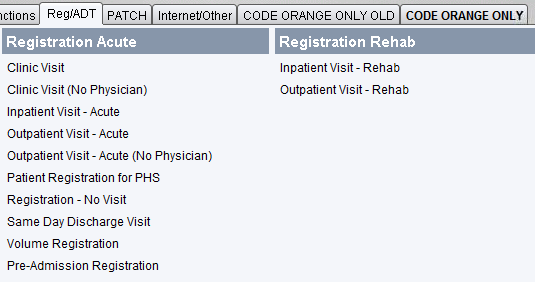
Click on the Reg/ADT tab under EPR's Main Desktop (REG/ADT stands for Registration/Admission, Discharge, and Transfer).
Acute Care Registrars
|
Toronto Rehab Registrars |
|
You will see two banners: Registration Acute and Registration Rehab.  |
You will see various registration options under the Registration Processing banner.  |
|
The Registration Functionality in EPR allows you to automatically launch the Visit Creation screen once registration is complete. However, if no visit has been confirmed yet, the alternative to create Registration (No Visit) is available. |
Note: EPR options may vary dependent on your role and/or type of EPR access.
The following are detailed descriptions of common Registration options:
Clinic Visit (CP) - When a patient is seen by a physician or a nurse in a clinic (they may or may not also get tests done).
Inpatient (IP) - When a patient needs to stay overnight due to a medical procedure, surgery or condition. Directive always comes from the physician.
Outpatient
(OP) - When a patient comes into hospital for any diagnostic testing
such as labs and Medical Imaging, or other health care professionals
other than a physician.
Note: All ambulatory visits
at Toronto rehab are classified as OP visits
Outreach Health Visit - Used for Outreach Health visits.
Outpatient Research Visit - When a patient is seen by a Research Coordinator (staff) and does not have a physician assigned to the visit.
Same Day Visit (SP) – When a patient has a medical/surgical procedure done and is at the hospital.
Pre-Admission Registration – When a patient needs to visit clinic prior visit/surgery for pre-admission consults/assessment/education.
Patient Registration for PHS - Used to register patients whose subsequent visits will be created in PHS.
In addition to the above selections, you may see some additional options attached:
(No Launch) – Allows you to register a patient without launching the visit screen automatically.
(No Physician) – Allows you to register a patient and launch the visit screen even though the attending physician is unknown.
1. Upon selecting a registration option on the Reg/ADT tab, the next screen will prompt you to enter a patient ID (except the Volume Registration option, which prompts you to enter a patient name).
Best Practice: When all patient records are kept together, this improves patient safety. Avoid re-registering a patient/creating a duplicate, by first doing a through search to see if the patient already exists in EPR. When searching, search by:
a. Ontario Health Card number, insert the letter O in front of the OHIP number. If no match is found, then
b. search by the patient's last name, first name.
Note: Always ensure that the patient's name entered in EPR matches the physical health card or government issued identification. The name musts appear as follows:
Legal Last Name, First Given Name and First Middle Name (initials should NOT be used)
If the patient has multiple middle names, use the full first middle name only.
If the patient has a single name (no last name) then put the same name in both fields (last name, first name).
2. As part of our example, we are going to assume our patient was not found in the system.
Note: If the correct patient’s name had shown up, then you would select that patient and skip the registration process entirely. Click Add to start the registration process.

3. You will be brought to the first of six screens of the Registration process.
The name of each screen will be located under the UHN Standard Registration title on the top left area. Completing each screen follows a similar process:
Mandatory fields indicated by the dark blue field numbers. (Even though the rest are not mandatory, it is encouraged that all, and as much information, be entered accurately to maintain quality data in the EPR.)
Non-numbered fields and labeled with "**” can not be edited because they are either specific to areas of the hospital, or the information automatically populates.
To bypass a field, simply click OK.
At the end of each screen, the Transaction Line will prompt you with Select field to edit for an opportunity to change/add anything on the screen.
To navigate from screen to screen, click Next Screen or Previous Screen.
Note: Clicking on the Back button at any point during Registration may take you to the start of the task without saving anything you entered. Therefore, avoid the option if possible and use alternative buttons.
Patient Demographics (screen 1)
The Patient Name auto-populates with the search name. Field 2 is dark blue indicating that it is the currently selected field, requiring a response. The Transaction Line instructions relate to that field.

Each field and their description is as follows:
Sex - Patient’s gender. If uncertain, use Unknown.
Duplicate MRN? - This field is for Health Records to identify which records need merging.
** MRN - EPR auto-generates a Medical Record Number (MRN) upon registration completion.
Title - If applicable, patient’s title, such as Mr or Mrs.
Maiden Name/Alias - If the patient is known by another name. EPR name searches will also use this criteria.
Preferred Name - If the patient has a preferred name. EPR name searches will not use this criteria.
Date of Birth - Use the format ddmmyy.
Ontario Health Card (OHIP) - The Ontario Health card number gets validated with the Ministry of Health at EPR’s visit level. However, you can choose to manually enter the number in this screen.
OHIP Version Code - Version codes are either one, two or no letters after the numbers. If applicable, enter them here.
OHIP Expiry Date - This field will auto-populate when you validate the Health Card at the visit level, so you may bypass it.
OHIP Response Code - This field
will also auto-populate when the Health Card is validated at visit
level, so you may bypass it.
Note: A valid card will populate any codes between 50-55.
OOP Health Number - If the patient is from out of province, you would enter the OOP Health card number here.
OOP Province - In a follow-up to the previous field, and if relevant, you would select the appropriate Provincial/Federal insurance here.
Insurance Comment - If applicable, any pertinent information not captured anywhere else in the EPR should be included here for Finance to review, especially for non-Ontario Health Card patients.
Address - Patient’s home address. If circumstances require, the following may be entered:
I0I 0I0 = incorrect address
X0X 0X0 = no fixed address
U0U 0U0 = unconscious
W0W 0W0 = withheld
Residency Code - Auto-populates once the previous field’s home address is complete.
Primary Phone Number - Indicates the primary phone number; whether it is a mobile, home or other number.
Secondary Phone Number - If applicable, enter a secondary phone number.
Mailing Address/Notification Information (screen 2)

Each field and their description is as follows:
Primary Care Provider
- The Primary Care Provider may receive notifications from EPR, if their name is properly added. Select the Primary Care
Provider option, and edit if necessary. To add someone in, choose
Insert.
Note: To replace a physician, you would simply choose Delete
to remove the current PCP and then add the new one in. To search
for the physician, simply enter the name in with last name, first
name. If patient does not have a PCP, you would choose the
None button.
Preferred Language - Select the patient's preferred language. See Language Data Collection eLearning Module.
Interpreter - If applicable, interpreters are available at UHN. See UHN Interpretations and Translation Service FAQs. Patient Email Address - Patient’s email address.
Mailing/ Temporary Address - Patient’s mailing address.
Type: M/T - If the mailing address entered is temporary because they are moving, then you would select Temporary. Otherwise, you may bypass this field.
Address Exp Date - If applicable, you would indicate the date of a move to a new address.
Next of Kin Name - Patient’s closest, related person, such as a parent or sibling.
Relationship - Patient’s relation to the next of kin.
Next of Kin Address - Next of kin’s address; can be the same as patient.
Email Consent - Care - Indicates the patient’s consent to be emailed for care purposes. When obtaining patient consent, refer to the Consent and Privacy Protection and/or the Consent for Email scripts for guidance. Further information can also be found on the Email Collection in EPR website.

EPR will prompt you: Does the patient consent to be contacted VIA EMAIL:
If you select (Y)Yes, the Email Address field (next field) will be mandatory.
If you select (N)No or (X)N/A, the Email Address field will not be editable and the data will be cleared.
If you select (P)Pending, the Email Address field will not be editable and the data will be cleared
Email Address - Enter the patient’s email address.
Date of Consent/Decline - The date on which consent was asked.
Research - Indicates the patient’s consent to be emailed for research purposes. This is documented independently and in addition to Email Consent - Care field.
{NOK} Primary Phone # - Next of kin’s primary phone number; can be the same as patient.
{NOK} Secondary Phone # - Next of kin’s secondary phone number.
Out of Country Phone # - If applicable, enter the phone number of the patient if they don’t reside in Canada and have an international phone number.
Emergency Contact(s) - This should be the person to call in case of emergency. It can be the same or different person from the next of kin.
Emergency Contact Phone # - Emergency Contact’s phone number.
Additional Information (screen 3)

Each field and their description is as follows:
Faith Group - Patients may or may not want to disclose this information. If not, you may select the Chose not to disclose option.
Veteran - Is the patient a Veteran? If so, choose Yes.
Future Contact with Foundations - This field defaults to Yes. If the patient indicates otherwise, choose No.
Comments - Used to communicate additional information, if applicable.
Note: Martial Status, Citizenship and Refugee fields are no longer in use. If is data present, please remove it.
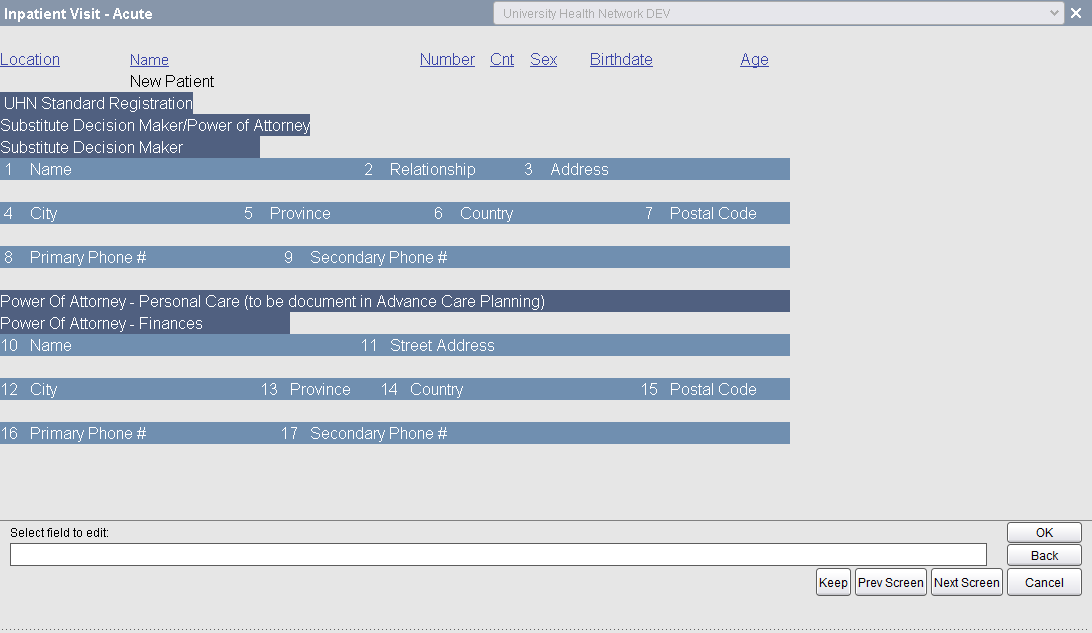
Substitute Decision Maker/Power of Attorney (Screen 4)

Each field and their description is as follows:
Substitute Decision Maker: Name - Enter their name.
Substitute Decision Maker: Relationship - Specify their relationship to the patient.
Substitute Decision Maker: Address - Enter their address.
Substitute Decision Maker: Primary Phone # - Enter their Primary Phone number.
Substitute Decision Maker: Secondary Phone # - Enter their Secondary Phone number.
Power of Attorney- Personal Care - Please document under Unscheduled Procedures- Advanced Care Planning
Power of Attorney- Finances: Name - Enter their name.
Power of Attorney- Finances: Street Address - Enter their address or choose same as patient.
Power of Attorney- Finances: Primary Phone # - Enter their Primary Phone number.
Power of Attorney- Finances: Secondary Phone # - Enter their Secondary Phone number.
Program Affiliation (screen 5)
This screen contains fields specific to particular teams and sites across UHN. This includes UHN programs (Congenital Cardiac, RGP, Peritoneal Dialysis, and Transplant Patients), the Clinical Trial Patient field, and fields required for patients at Princess Margaret hospital. If the patient condition changes, then these need to be updated.

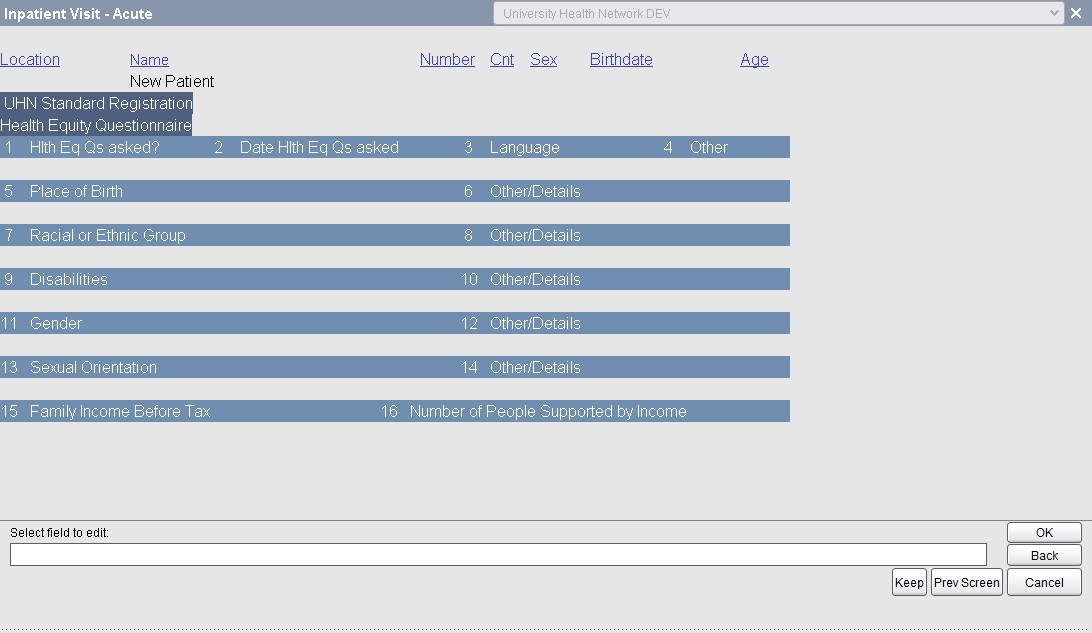
Health Equity Questionnaire (screen 6)

This Health Questionnaire is part of the Measuring Health Equity Project, specific to the Toronto region healthcare settings. Its' goal is to collect patient data to ensure healthcare access is equitable across various demographic groups. More information about this project and specific instructions on how to conduct an actual in-person health equity Q&A with a patient can be found by visiting the following:
Notes:
Responding to these questions are optional for the patient, but should be asked every five years.
The questions are self-explanatory and easy to complete.
The Other/ Details field is a prompt for additional information or comments to be free-texted in, if required.
Saving Registration (summary screen)
When all screens are ready to be saved, you can click the Keep or OK button on the bottom right to jump directly to the summary screen (as seen directly below).
Note: If the Ontario Health Card was not entered manually, you will notice an Incomplete, accept allowed message next to the Patient Demographics in the adjacent column. Until the OHIP number is entered, you will only be able to Accept as Partial registration.

Once you click on (P) Accept as Partial, EPR will generate the new Medical Record Number (MRN) number.
1. Click OK to proceed.
2. If your unit requires you to print the registration reports, click YES, otherwise, bypass the page.
The patient is now registered and a visit can be created.