For the latest updates, see EPR Release Notices.
For EPR related videos, check out Digital Education's YouTube Channel.
For the latest updates, see EPR Release Notices.
For EPR related videos, check out Digital Education's YouTube Channel.
Bed Management
Covered in this topic:
Bed swaps are performed when there is a direct swap of beds between two patients on the same unit. Bed swaps are initiated only with active patient visits.
The reason for a bed swap varies from patient room preference to convenience for the nursing team providing care.
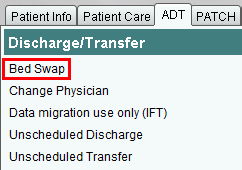
1. From Patient’s Desktop ADT tab, click on Bed Swap under the Discharge/Transfer banner.

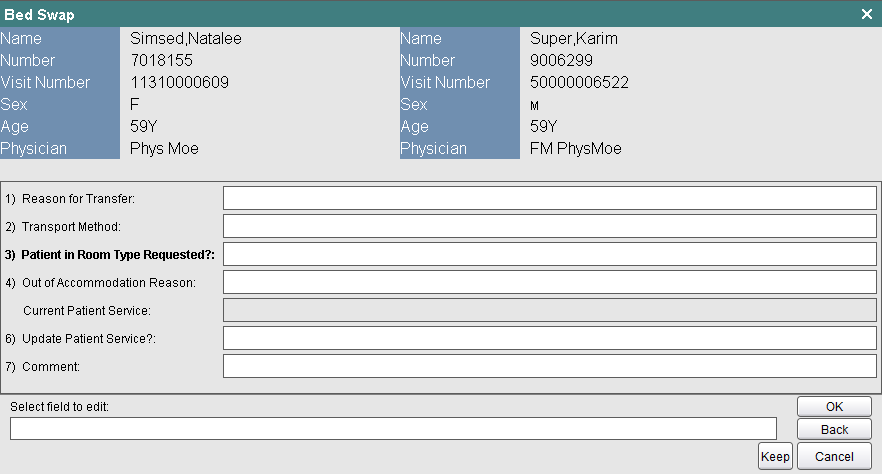
2. The Transaction Line will prompt you to enter the first patient ID. You may enter in any of the two patients' IDs that are being swapped. The order does not matter. Click OK and select the appropriate patient from the list.
3. Complete all mandatory fields, along with any additional information you might have.

4. (A) Accept to save all changes.
5. Choose (A) Accept Patient Bed Swap to complete the bed swap (or you may choose (E) Continue Editing if further changes need to be made). The (P) Accept as Partial button should not be used.
Once complete, the changes should be affected and show in your patient’s Location in the Demographic Banner.
Beds are removed from service when a room and/or a bed are not available for patients’ use. The reasons for this could vary and include from, a room needing maintenance/cleaning to insufficient staffing, and temporary holiday closures.
To remove a bed from service:
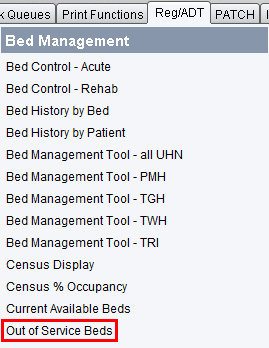
1. Refer to the Main Desktop’s Reg/ADT tab (since the task is not patient specific), and click on Out of Service Beds under the Bed Management banner.

2. From the next screen, select from the list provided as many unit areas as required and click OK.
3. A listing of beds already removed from service will show on the next screen for the selected unit area(s). If not listing is displayed, it means there are no out of service beds for the selected unit area(s).
4. To put beds on Out of Service, you would choose (R) Remove From Service. (If any existing beds within the same unit(s) are already removed from service, they will show here. Therefore, an absent list will mean there are none).

5. A listing of all beds for the selected unit area(s) will show on this next screen – including only the vacant, occupied or reserved statuses. Beds already put out of service will not be shown as part of this list.
Select the bed(s) you would like to remove from service and click OK.
Note: Even though the system will allow you here to choose occupied or reserved beds here, it is not to be used (for obvious reasons).
6. When prompted to Enter effective date, you may type in date - ddmmyy. Alternatively, and if applicable, use EPR’s shortcut ‘t’ for system to generate today’s date; Click OK.

7. Select or free text Reason Code and click OK.
8. Choose Accept to save your changes.
9. The listing vacant, occupied and reserved beds for the selected unit area(s) will be updated on the next screen. Click OK.
10. All Out of Service Beds for the selected unit area(s) will now be listed.

Alternatively, you may also see the bed’s status under the Inpatient by Unit listing, found on the Main Desktop’s Pt Selection tab.
Make sure to specify the unit by clicking the appropriate one in the Unit drop down menu. You should see the Out of Service bed under Status (example below).

To place beds back in service, you would go through the exact same steps of removing them from service, except you would choose option to (P) Place in Service from the first screen from the Main Desktop.
The table below provides descriptions of bed statuses:
| Bed Status | Definition |
|---|---|
| HK | Bed being cleaned by Housekeeping |
| PD | Pending Discharge |
| PT | Pending Transfer |
| OCC | Occupied Bed |
| VAC | Vacant Bed |
| OUT Closed | Out of Service |